How to Limewash Walls: Step-by-Step Guide for Beginners (2026)
Updated April 26, 2026 · 11 min read · By ThePaintly Editorial Team
Learning how to limewash walls is one of the most rewarding DIY paint projects you can take on. The finish looks like it took a professional three days to achieve — but the actual technique is straightforward once you understand the two things that matter: working in small sections and manipulating the paint while it’s still wet. Get those two things right and the rest follows naturally.
This guide walks you through every step — from surface prep to final coat — so your first limewash project looks intentional rather than accidental. Whether you’re working on smooth drywall, plaster, or brick, the core process is the same and it’s covered in full below.
Tools & Materials You’ll Need
| Item | Recommended Option | Notes |
|---|---|---|
| Limewash paint | Romabio Classico | Mineral formula — best depth and authenticity |
| Application brush | Marmorino/Classico brush | Long flexible bristles — critical for proper texture |
| Spray bottle | Any pump sprayer | For misting the wall before application |
| Clean rags or sea sponge | Lint-free cotton rags | For wiping back and creating variation |
| Painter’s tape | 3M ScotchBlue | Protects trim, outlets, and adjacent surfaces |
| Drop cloths | Canvas drop cloths | Limewash drips more than standard paint |
| Rubber gloves | Any waterproof gloves | Lime is alkaline — protect hands throughout |
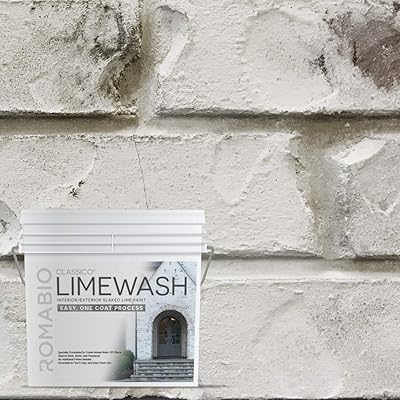
For how-to guides, the product recommendation matters as much as the technique. Romabio Classico is the product most interior designers, contractors, and experienced DIYers use for limewash walls — because it behaves the way authentic limewash should. It stays wet long enough to work the texture, dries lighter than it looks applied (giving you visual feedback), and the finish deepens naturally with a second coat rather than just getting darker.
The key technical advantage over water-based alternatives is working time. Romabio gives you 5–8 minutes of workable time per section — enough to apply, texture, and wipe back before the paint sets. Cheaper water-based products often dry faster, which creates hard lines and rushed patches rather than the smooth, continuous variation you’re looking for. The brush included in Romabio kits is specifically designed for limewash — not interchangeable with a standard paint brush.
- Longer working time — easier texture control
- Authentic mineral carbonation finish
- Available in wide color range
- Higher price than water-based alternatives
- Requires proper brush for best results
Best for: All interior limewash wall projects where finish quality matters
Check Price on Amazon →Via Amazon.com
Related: Choosing the right product is the first step. See our full best limewash paint guide for a comparison of all major brands — including the most affordable option for large rooms.
Step-by-Step: How to Limewash Walls
Follow these steps in order. Each stage builds on the previous one — skipping prep is the most common reason a limewash project looks uneven or faded instead of elegantly aged.
Clean and Prepare the Wall
Wipe the wall down with a damp cloth to remove dust and grease. Pay particular attention to areas near light switches, baseboards, and door frames where hand oils accumulate. For walls with glossy paint, lightly sand the surface with 120-grit sandpaper to create a tooth — mineral limewash needs something to grip. Fill any holes or cracks with spackling and allow it to cure fully before proceeding. The wall doesn’t need to be perfect, but it does need to be clean, dry, and free of peeling paint.
Tape Off Trim, Baseboards, and Outlets
Limewash is more fluid than standard paint and drips easily. Tape off all trim, baseboards, window frames, outlets, and switches carefully. Unlike latex paint, mineral limewash has a strong alkaline pH that can etch certain surfaces if left wet — so masking more aggressively than you think necessary is worthwhile. Lay canvas drop cloths on the floor along the base of the wall. Plastic sheeting works but limewash sits on plastic rather than absorbing, so any drip can run further before stopping.
Lightly Mist the Wall
Using a spray bottle, mist the wall section you’re about to paint with clean water. You want the surface damp — not wet or dripping, just slightly hydrated. This slows the drying of the limewash and extends your working time per section from 3–4 minutes to 5–8 minutes. On smooth drywall, this step is important. On porous brick or old plaster, it’s essential — without pre-wetting, the substrate absorbs the water from the limewash before you can work it, and the finish dries too fast to manipulate.
Apply the First Coat in a Crosshatch Motion
Load your brush generously and apply the limewash to a 2×2 foot section using a bold X-pattern — diagonal strokes in both directions. Don’t try to cover the wall perfectly or evenly with this first coat. The intention is to get paint on the wall with visible brush direction variation. Work quickly and maintain wet edges within your section. Move across the wall in columns rather than rows — top to bottom, then shift to the next column. Allow the first coat to dry for at least 4–6 hours before the second coat.
Wipe Back for Texture (While Wet)
Immediately after applying each section — within 2–3 minutes while the paint is still wet — take a damp rag or sponge and lightly drag it over the surface in irregular, imperfect strokes. This is where the magic happens. The rag pulls paint from the high spots and moves it into the brush texture valleys, creating the layered, aged look. Vary your pressure and direction — lighter wipes leave more paint behind, heavier wipes reveal more of the base. There’s no wrong approach here. The only mistake is applying the wipe-back too uniformly, which makes it look patterned rather than organic.
Allow Full Drying Before Second Coat
Let the first coat cure for at least 4–6 hours in normal indoor conditions (65–75°F). Mineral limewash dries significantly lighter than it looks wet — expect 30–40% lighter. Don’t panic at this stage. Many first-timers see the dried first coat and think the project isn’t working; it looks pale and patchy. The second coat is what brings everything together. High humidity or cold rooms slow drying and can cause the limewash to remain tacky — ensure good ventilation and avoid applying in rooms below 55°F.
Apply the Second Coat and Build Depth
The second coat follows the same process as the first — mist, crosshatch application, wipe-back — but this time you have more control over the final look. Apply the second coat slightly thicker in areas where you want more color, and wipe it back more aggressively in areas where you want the aged, worn-through effect. The variation between first and second coat visibility is what creates the depth. In corners, natural variation tends to accumulate; on flat sections it lightens. This mimics how lime naturally weathers over decades.
Final Cure and Optional Sealing
Allow the finished wall to cure for a minimum of 24–48 hours before touching it or repositioning furniture against it. Mineral limewash fully carbonates over 2–4 weeks — the finish hardens and becomes more durable during this period. In high-traffic areas or if you need washability (a kitchen or hallway), you can apply a thin coat of matte mineral sealer after the full cure. Don’t use glossy sealers — they destroy the limewash’s matte, breathable character. In most living spaces, sealing is not needed.
⚡ Pro Technique Tips
- Never work a section to completion before moving on. Keep a wet edge by working in overlapping columns rather than finishing one area fully before starting the next. Hard edges between dry and wet sections are visible in the finished wall.
- Vary your brush load. A heavily loaded brush creates darker patches; a dryer brush creates lighter, more textured areas. Alternating between the two within a single section naturally creates variation without looking forced.
- Corners need extra attention. Limewash builds up in inside corners, creating dark lines that look unintentional. Stipple or lightly dab inside corners with a dry brush after applying to break up the concentration.
- Step back frequently. Limewash looks very different at arm’s length versus from across the room. Step back every few sections to check the overall balance and adjust before the paint sets.
Renovation Stage: PAINT
Limewash wall painting is a PAINT stage project. It requires clean, dry, properly prepped walls before you begin. If you’re working on walls with old, glossy, or peeling paint, you’ll need to address that first — see our guide to the best paint removers for walls before starting.
⏱ Limewash Wall Project Time Estimator
Estimate how long your limewash project will take from prep to final coat.

Technique Guide: Achieving Different Limewash Looks
Limewash is one of the most versatile paint techniques because small changes in application create dramatically different finished looks. Here are the main style variations and how to achieve them.
The Classic Aged Look
Apply the first coat in full crosshatch coverage, then wipe back with a damp rag using long, horizontal strokes. For the second coat, apply only in patches — leaving some first-coat areas untouched — then wipe back again in the same horizontal direction. The result is a wall with obvious color depth variation that reads as centuries-old plaster. This is the most popular limewash look for Mediterranean, farmhouse, and European country interiors. According to This Old House's limewash technique guide, working the second coat while slightly overlapping dry first-coat areas creates the most convincing aged patina.
The Modern Textured Look
For a more contemporary result — less obviously "old world" — use a sea sponge instead of a rag for the wipe-back step. Stipple the sponge over the wet limewash in a light dabbing motion rather than dragging strokes. The result is a fine, cellular texture that photographs well and reads as deliberate surface treatment rather than historical authenticity. This style works well in modern and Scandinavian interiors where the goal is texture and depth rather than an aged character.
The Washed-Out Tone
For very subtle limewash — more of a soft, matte, slightly textured finish rather than a strong color effect — dilute the limewash 10–20% with water before applying. A single diluted coat applied and wiped back immediately creates a very thin veil of color that suggests limewash without dominating the space. This works well in rooms where you want texture without committing to a stronger color shift, or as a base layer before a more deliberate accent treatment. Family Handyman recommends this approach for first-time applicators testing the technique before committing to a full room.
Related: Limewash isn't the only decorative finish worth knowing. See our guide to making custom colored chalk paint at home for another high-impact textured finish that uses a completely different technique and product base.
Surface-Specific Tips
Smooth Drywall
The most common starting point. Pre-wet the surface before application. The technique carries all the visual weight since the wall itself has no natural texture — your brush direction and wipe-back pressure create everything. A second coat is not optional on smooth drywall; a single coat looks underfed. Work in 2×2 ft sections maximum to prevent the edges from drying before you can blend them.
Brick and Concrete Block
The substrate does much of the work. Clean the brick thoroughly with a stiff brush and allow it to dry completely — at least 48 hours after any cleaning. Pre-wet the brick with a garden sprayer before application. Mineral limewash soaks into the pores of the brick and mortar joints differently, creating natural variation without any additional technique. Use a thicker brush and work the paint into all mortar lines. The result after two coats is stunning and very low-effort visually — the brick texture breaks up the color naturally.
Plaster and Venetian Plaster
The most traditionally compatible surface. Old plaster walls absorb limewash deeply and the result looks genuinely antique after just one application. Ensure the plaster is sound — no hollow sections or active cracks — before proceeding. On Venetian plaster (a smooth, polished surface), limewash sits differently: it creates a lighter, more veiled effect since the surface has less porosity. Test a small section first to check absorption before committing to the full wall.
Final Tips for a Successful Limewash Project
Limewash rewards patience and penalizes rushing. The single most important habit is working in small sections and manipulating the paint before it sets — everything else is secondary. Test your technique on a scrap piece of drywall or an inconspicuous area before tackling a full accent wall, and always view your test patch under natural light after a full 24-hour cure before making color decisions.
If your first wall doesn't look perfect, remember: limewash is forgiving. A third thin coat can fix problem areas, and additional wipe-back after the second coat cures (within the first hour of application) can deepen any sections that look too flat. The goal isn't perfection — it's a finish that looks like it was built up slowly over time, which is exactly what the technique produces when you let it work naturally.
Frequently Asked Questions
How long does it take to limewash a wall?
A typical 10×12 ft accent wall takes 2–3 hours for two coats, including prep, application, and wipe-back. This includes the 5-hour drying time between coats — so the total elapsed time spans about 7–8 hours across one day. Brick or textured surfaces take longer because working into the surface texture requires more brush pressure and time. Factor in full cure time of 24–48 hours before the wall can be touched or furniture moved back.
Do I need to prime before limewashing walls?
On new, unpainted drywall, a coat of drywall primer is recommended before mineral limewash. The primer seals the paper face of the drywall and creates a more even absorption rate across the surface. On previously painted walls in good condition, primer is not needed — just ensure the existing paint is clean, dull, and well-adhered. On brick and masonry, no primer is needed and mineral limewash bonds directly to the substrate.
Can you limewash over dark paint?
Yes, but the underlying color will influence the final result. Since limewash is semi-transparent, a dark base will show through the lighter limewash finish and warm or deepen the tone — sometimes in a desirable way. If you want a clean, light limewash result on a dark wall, apply a coat of white or off-white latex primer first to neutralize the base color before applying limewash on top.
Can you limewash a bathroom or kitchen wall?
Yes, but with precautions. Mineral limewash is breathable and handles moderate humidity well — it's been used in bathrooms for centuries. Avoid applying it directly behind sinks, showers, or in areas with direct water splash. For kitchen backsplash areas, apply a matte mineral sealer after the full cure (48+ hours) to add washability and light water resistance. Don't use glossy sealers, which destroy the limewash appearance.
What brush do I use to apply limewash paint?
A Marmorino-style or Classico brush with long, flexible natural bristles is the correct tool for limewash application. These brushes allow you to apply significant pressure and drag the bristles through the paint to create the directional, layered texture. Standard paint brushes with shorter, stiffer bristles don't flex enough to create proper variation. Romabio and other mineral paint brands sell the correct brush — it's worth the investment.
How do you fix limewash mistakes?
Within the first hour of application, limewash can be modified by re-wetting the section with water and reworking the texture with a brush or rag. After the paint fully cures (24+ hours), you can apply a thin additional coat over problem areas and wipe it back to blend. Hard lap lines can be softened by feathering a very diluted (20% paint, 80% water) limewash over the transition. Major mistakes or color changes may require stripping the limewash and starting over — see our paint removal guide for mineral finishes.
How do you clean limewash walls after they're finished?
Cured mineral limewash walls can be cleaned with a barely damp cloth using gentle pressure. Avoid abrasive cleaners or scrubbing pads, which can scratch the finish. For routine dust, a soft dry cloth or microfiber duster works well. Water-based "limewash effect" products are more robust and can typically tolerate mild soap cleaning once fully cured. If you applied a mineral sealer, the wall is more washable and can tolerate light cleaning with mild detergent.