How to Retrofit Recessed Lighting (+ 4 Kits That Work)
Updated: June 2026 | By Sophie Ulman
The wrong retrofit kit can leave you with a fixture that flickers every time a cloud passes over the solar panels, gaps around the trim that let attic air pour into your living room, or — the one I learned the hard way — a fire hazard sitting above your insulated ceiling. Retrofit recessed lighting is one of the fastest electrical upgrades you can make, but only if you choose the right kit and know the two or three things that actually matter before you start pulling trim.
I’ve done this in four different houses now, replaced somewhere around 60 fixtures total, and the process has gotten genuinely simple with modern LED retrofit recessed lighting kits. Most go in under 10 minutes per light. No electrician, no new wiring, no cutting. Here’s exactly how to do it — and the four kits I’d actually buy.
⚡ Quick Picks
What “Retrofit Recessed Lighting” Actually Means
A retrofit kit is an all-in-one LED module that replaces the bulb and trim in your existing recessed can — without touching the housing. You unscrew the old bulb, plug in the adapter that comes with the kit, and clip the new LED disk into place. The original metal can stays in your ceiling. The new LED trim snaps into it using spring clips or torsion springs.
What you get: a flat, modern LED disk that sits flush with the ceiling, uses 75–85% less energy than the incandescent it replaced, and lasts 25,000–50,000 hours. What you don’t get: a reason to hire an electrician or rent a drywall saw.
If you’re looking at brand-new installations with no existing cans, that’s a different project. For that, see our guide to best flush mount recessed ceiling lights and the broader home lighting buyer’s guide.
Before You Buy: 3 Things to Check
1. Can size: measure the opening, not the trim ring
The number that matters is the inside diameter of the metal housing, not how big the trim ring looks from below. Pull the old trim off, look up into the can, and measure across the inside opening. Most residential cans are 4″, 5″, or 6″. Many retrofit kits cover both 5″ and 6″ — but don’t assume. If you order a 6″ kit for a 4″ can, it won’t clip in. The spring arms have nowhere to grab.
2. IC rating: check if your ceiling has insulation
This is the one I got wrong on my first retrofit job. I replaced 12 fixtures in a bedroom that had blown-in insulation directly above the ceiling — and I used non-IC-rated kits because they were cheaper. Non-IC-rated fixtures have to maintain a 3-inch clearance from insulation. I had zero clearance. I ended up pulling all 12 and doing it again with IC-rated kits. If your attic has any insulation near your cans, IC-rated is not optional.
How to check: go into your attic if you can and look at the tops of the cans. If insulation is touching or close, get IC-rated. If you can’t access the attic, assume IC-rated and be safe.
3. Your dimmer switch
If your existing dimmer was installed before 2018, it almost certainly wasn’t designed for LED loads. Old incandescent dimmers work by reducing voltage — that causes LED retrofit lights to flicker, buzz, or not dim smoothly below about 30%. Before you spend money on retrofit kits, check if your dimmer is labeled “LED compatible” or “CFL/LED.” If it isn’t, budget an extra $15–25 per switch for a replacement. Lutron and Leviton both make solid LED dimmers that eliminate 90% of flicker complaints I’ve seen.
Renovation Stage
PREP — Retrofit recessed lighting is pre-paint work. Complete before ceiling touch-ups or any painting. Clips and springs can scratch fresh paint, and you may need to caulk the trim edge after installation.
4 Retrofit Recessed Lighting Kits Reviewed
1. mw 6 Inch 4 Pack — Best Overall
 PREP
Best Overall
PREP
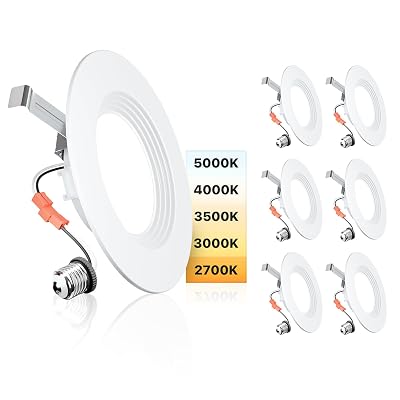
Best Overallmw LED Recessed Lighting 6 Inch Retrofit, 14W, 5CCT, IC & Wet Rated
The mw kit uses a 14W driver that puts out 1,100 lumens — that’s roughly the equivalent of a 90W incandescent, which is noticeably brighter than the 60W equivalent bulbs most people have been living with. The 5CCT selector on the back lets you set color temperature before you clip the fixture in place: 2700K, 3000K, 3500K, 4000K, or 5000K. It’s a physical slider, not something you have to set through an app.
What I like about this kit specifically: it’s both IC-rated and wet-rated. That combination matters if you’re retrofitting bathroom ceiling fixtures, kitchen lights over a sink, or any space with humidity. Wet-rated fixtures can handle condensation and splash. Most budget retrofit kits skip the wet rating and are damp-rated only — fine for bedrooms and living rooms, not ideal for bathrooms. The mw is ETL listed and California JA8 certified, which means it passed a more stringent efficiency and performance standard than federal minimums require.
✓ Pros
- IC + wet rated (bathrooms, kitchens)
- 5CCT selectable
- 1,100 lumen output
- ETL + California JA8 certified
✗ Cons
- 4-pack only (no 6 or 12 pack)
- Slightly pricier per unit vs. value packs
Best for: Bathrooms, kitchens, and any ceiling with insulation where you need both IC and wet ratings in a single kit.
Check Price on Amazon → Via Amazon.com2. AKIHE 6 Inch 4 Pack — Best for Living Rooms and Dining Areas
 PREP
Best for Living Rooms
PREP
Best for Living RoomsAKIHE 6 Inch LED Retrofit Recessed Lighting, 10W, 90 CRI, Anti-Glare
The AKIHE’s differentiator is its 90 CRI (Color Rendering Index) rating combined with an anti-glare design. CRI measures how accurately a light source renders colors compared to natural daylight — 90+ is where colors on walls, artwork, and furniture start to look the way they’re supposed to. Most budget retrofit kits sit at 80 CRI, which is enough for utility spaces but makes your living room feel slightly washed out. The anti-glare baffle trim reduces the direct glare when you look up toward the fixture, which matters in lower-ceiling rooms where fixtures are more visible.
The 10W output gives you 800 lumens — equivalent to about a 110W incandescent. Sufficient for ambient light in a living room with multiple fixtures. If you’re using these as the only light source in a room, the mw kit’s 1,100 lumens will serve you better. But for rooms where lighting mood matters — dining rooms, living rooms, hallways — the 90 CRI makes the investment worthwhile.
✓ Pros
- 90 CRI — best color rendering in this list
- Anti-glare baffle trim
- 5CCT selectable
- 10%-100% smooth dimming
✗ Cons
- 800LM lower than mw kit
- Damp rated, not wet rated
Best for: Living rooms, dining rooms, and hallways where color accuracy and reduced glare matter more than maximum brightness.
Check Price on Amazon → Via Amazon.com3. Ensenior 5/6 Inch 6 Pack — Best Value
 PREP
Best Value
PREP
Best ValueEnsenior 5/6 Inch 5CCT LED Retrofit Can Lights, 6 Pack, 9W, 1,000LM, IC Rated
The Ensenior’s main advantage is that it covers both 5″ and 6″ cans in one kit — the spring arms adjust to fit either size, which matters if your house has a mix. I’ve seen this in 1980s and 1990s builds fairly often, where the original contractor used whatever was available. The 9W driver puts out 1,000 lumens, which is competitive with anything at this price tier. The 5CCT selector lets you match the color temperature to other rooms.
Being IC-rated means it’s safe for insulated ceilings. The 6-pack pricing drops the per-unit cost below most 4-pack alternatives, making this the choice for whole-house projects where you’re replacing 10+ fixtures. The limitation: damp rated only. Keep it out of steam-heavy bathrooms and direct-moisture areas. For bedrooms, hallways, living rooms, and offices, it performs exactly as advertised.
✓ Pros
- Fits 5″ and 6″ cans
- 6-pack best per-unit value
- IC-rated for insulated ceilings
- 1,000LM output
✗ Cons
- Damp rated only — not for wet areas
- 80 CRI (adequate, not premium)
Best for: Whole-house retrofits in homes with mixed 5″/6″ can sizes, where cost-per-fixture matters most.
Check Price on Amazon → Via Amazon.com4. Commercial Electric 6 Inch Retrofit — Most Widely Available
 PREP
Most Accessible
PREP
Most AccessibleCommercial Electric 6 Inch LED Retrofit Recessed Lighting Kit
Commercial Electric is a Home Depot house brand that has been making recessed lighting for decades. The retrofit kits are consistently available in-store, which matters if you’re mid-project and need a replacement same-day. The installation mechanism is slightly different from the other kits here — it uses a plug-in adapter rather than a screw-in socket adapter, which some people find faster to install. The light output and color quality are competent without being exceptional.
The honest limitation: this kit tends to be priced higher per unit than direct-from-manufacturer options on Amazon. You’re paying a premium for the reliability of a known brand and the convenience of same-day availability. If you’re replacing two or three fixtures as a spot repair, that’s a reasonable trade. For a 20-fixture project, the Ensenior 6-pack will save you meaningful money for equivalent performance.
✓ Pros
- In-store availability (Home Depot)
- Established brand, consistent quality
- Damp rated
✗ Cons
- Higher cost per unit vs. direct options
- Fewer CCT options than competitors
Best for: Same-day repairs and small projects where in-store availability matters more than per-unit cost.
Check Price on Amazon → Via Amazon.comPro Tips from Sophie
- Set the CCT before you clip the fixture in. The selector is on the back of the LED module. Change it after the fixture is clipped into the ceiling and you’re pulling the trim back down, messing with tiny springs in an awkward position over your head. Do it on the ground.
- Test before you secure. After plugging in the adapter but before clipping the trim into place, flip the breaker and check that the light works. Discovering a dead fixture after you’ve already compressed eight spring clips is a frustrating way to spend 10 minutes.
- If the trim won’t sit flush, push the socket plate up first. Inside the can housing is a metal plate holding the socket. It can usually be slid upward and locked higher inside the can. If your retrofit trim is sticking out from the ceiling, this is almost always why.
How to Install Retrofit Recessed Lighting: Step by Step
What you need
- LED retrofit kit (sized to your can)
- Flathead screwdriver (for socket plate adjustment)
- Non-contact voltage tester (optional but worth it)
- Step ladder
Step 1: Kill the power — at the breaker, not just the switch
Go to your electrical panel and flip the breaker for the room, not just the light switch. Flip the light switch on after to confirm the power is actually off. If you have a voltage tester, touch it to the socket before you touch anything else. This is the step people skip when they’re in a hurry. Don’t skip it.
Step 2: Remove the old trim and bulb
Pull the trim ring straight down — it’s held by tension springs, not screws. Wiggle it slightly while pulling. Unscrew the bulb. Set both aside. You’re looking at the inside of the metal housing now.
Step 3: Adjust the socket plate if needed
Look for a metal plate inside the can that holds the bulb socket. If it’s sitting low, there may not be enough clearance for the LED module. Loosen the wing nut or screw holding it, slide the plate as far up into the can as it goes, and retighten. This takes 30 seconds and prevents the most common installation problem.
Step 4: Screw in the adapter
Your retrofit kit comes with a socket adapter — it looks like a light bulb base. Screw it into the socket. Snug, not cranked tight. The adapter will have a small plug hanging from it.
Step 5: Connect the LED module
Plug the LED trim’s cord into the adapter plug. Most connectors click into place. Before clipping the trim in, flip the breaker back on and test the light. Confirm it works, then turn the breaker off again before continuing.
Step 6: Clip the trim into place
Most retrofit trims use torsion springs — V-shaped wires on the sides of the module. Compress each spring, insert it into the retaining brackets inside the can, and push the whole module up until the trim ring sits flush against the ceiling. For retrofit recessed lighting with friction clips instead of springs, simply push the module straight up until the clips engage.
Step 7: Power on and check the fit
Turn the breaker back on. The light should come on. Check that the trim ring is flush all the way around — no gaps, no one side sitting lower than the other. If it’s not flush, pull it back down and recheck the socket plate position.

Energy Savings Calculator
💡 How Much Will You Save?
Retrofit Recessed Lighting Buying Guide
Size compatibility: the only chart you need
| Can opening (inside diameter) | Kit to buy | Common location |
|---|---|---|
| 4 inches | 4″ retrofit kit only | Older construction, accent lighting |
| 5 inches | 5″ or 5/6″ kit | Late 1990s–2000s residential |
| 6 inches | 6″ or 5/6″ kit | Most common — 1980s to present |
Measure the inside of the housing, not the outside of the old trim ring. Old trim rings can be larger than the can they’re covering.
IC vs. non-IC rating
IC-rated (Insulation Contact) means the fixture is safe to have insulation touching it. Non-IC-rated requires 3″ of clearance from insulation. If there’s any insulation in your ceiling cavity near these fixtures — blown-in, batt, spray foam — buy IC-rated. The Energy Star certification and OSHA guidelines both flag non-IC fixtures in insulated ceilings as a fire risk. This is not a minor technicality.
Damp vs. wet rated
Damp-rated fixtures handle humidity — fine for bathrooms with good ventilation. Wet-rated fixtures handle direct water exposure — needed for shower areas, outdoor covered ceilings, and over kitchen sinks. When in doubt, go wet-rated. The cost difference is minimal.
Lumens vs. watts: what actually matters
Watts measure energy consumption. Lumens measure light output. A 9W LED retrofit recessed lighting kit producing 1,000 lumens is significantly brighter than a 65W incandescent that produces the same. Compare lumen output, not wattage, when choosing between kits.
Dimmer compatibility
Most LED retrofit kits list compatible dimmers in their product specs. Look for Lutron Skylark, Lutron Diva, or Leviton Decora as safe starting points. If your current dimmers aren’t LED-rated, plan to replace them. A $20 dimmer swap is far cheaper than the flicker complaints that follow using the wrong one. For more on ceiling renovation prep including lighting work, that guide covers sequencing.
⚠ When NOT to Use a Retrofit Kit
- Old aluminum wiring: Pre-1975 homes sometimes have aluminum branch circuit wiring. LED retrofit kits are rated for copper wiring only. If you see silver-colored wire at the socket, stop and call an electrician.
- Non-standard socket types: Some commercial and specialty cans use GU10, GU24, or other non-E26 sockets. Retrofit kits are designed for standard E26 (screw-in) sockets. Check your socket before ordering.
- Severely damaged housings: If the metal can is corroded, cracked, or has visible scorch marks, replace the entire housing — not just the trim. A retrofit won’t fix the underlying problem.
- Recessed fixtures in shower enclosures without wet ratings: Steam and direct water spray require wet-rated fixtures specifically. Damp-rated is not sufficient for a direct shower application.
Verdict
For most bedrooms, living rooms, and kitchens with standard 6″ cans: the mw 4 Pack is the right call — IC and wet rated, 1,100 lumens, and 5CCT in one kit. For rooms where color accuracy matters, the AKIHE’s 90 CRI justifies the slightly lower lumen count. For whole-house projects with 10+ fixtures, the Ensenior 6 Pack gets the per-unit cost down while covering both 5″ and 6″ cans.
Whatever you choose, solve the dimmer question before you buy the fixtures. It’s the single most common source of post-install complaints with retrofit recessed lighting — not the fixture, the switch.