Introduction: Why Lighting Is the Final Layer of Every Paint Project
You’ve picked the perfect paint color, prepped the walls, and applied every coat with care. But here’s the truth most homeowners discover too late: your paint color only looks as good as the light hitting it. Lighting isn’t just functional — it’s the finishing layer that determines whether your color choices sing or fall flat.
This is where CRI, or Color Rendering Index, becomes your most important metric. CRI measures how accurately a light source reveals the true colors of objects compared to natural sunlight, on a scale from 0 to 100. A fixture with a CRI of 80 or below can muddy warm greiges, drain life from deep navy blues, and make bright whites look yellowed and tired.
For anyone who has invested in quality interior paint — whether it’s a Sherwin-Williams Accessible Beige or a Benjamin Moore Hale Navy — a high-CRI fixture (90+) is non-negotiable. It protects that investment.
In this guide, we break down the three best modern lighting solutions for 2026, explain the science behind color temperature, and walk you through everything from installation to maintenance.
Best For: Bedrooms, hallways, home offices, and any room where ceiling height is limited.
If you’ve ever wrestled with a bulky flush mount that sticks out like a saucer glued to your ceiling, the TALOYA is the antidote. At just 0.6 inches slim, this panel sits almost flush against the surface, creating a clean, architectural look that complements modern and minimalist interiors equally well.
But the real story is performance. The TALOYA delivers a CRI of 90+, meaning your paint colors — whether a soft sage green or a dramatic charcoal — will appear exactly as they did on the color swatch. No more guessing why your “greige” looks oddly orange after sundown.
Installation is where TALOYA truly separates itself from the competition. Its patented “Slide-to-Lock” mechanism eliminates the frustration of holding a fixture overhead while fumbling with screws. The bracket locks in with a simple slide, letting you complete the job in minutes rather than cursing through a half-hour ordeal. This makes it an ideal Top Rated LED Ceiling Panel for Home Officesand busy families who need a reliable DIY solution.
The smart functionality adds another dimension: compatible with most standard dimmers and available in tunable color temperatures, you can shift the mood from energizing daylight (5000K) to a cozy warm glow (2700K) with a simple adjustment.
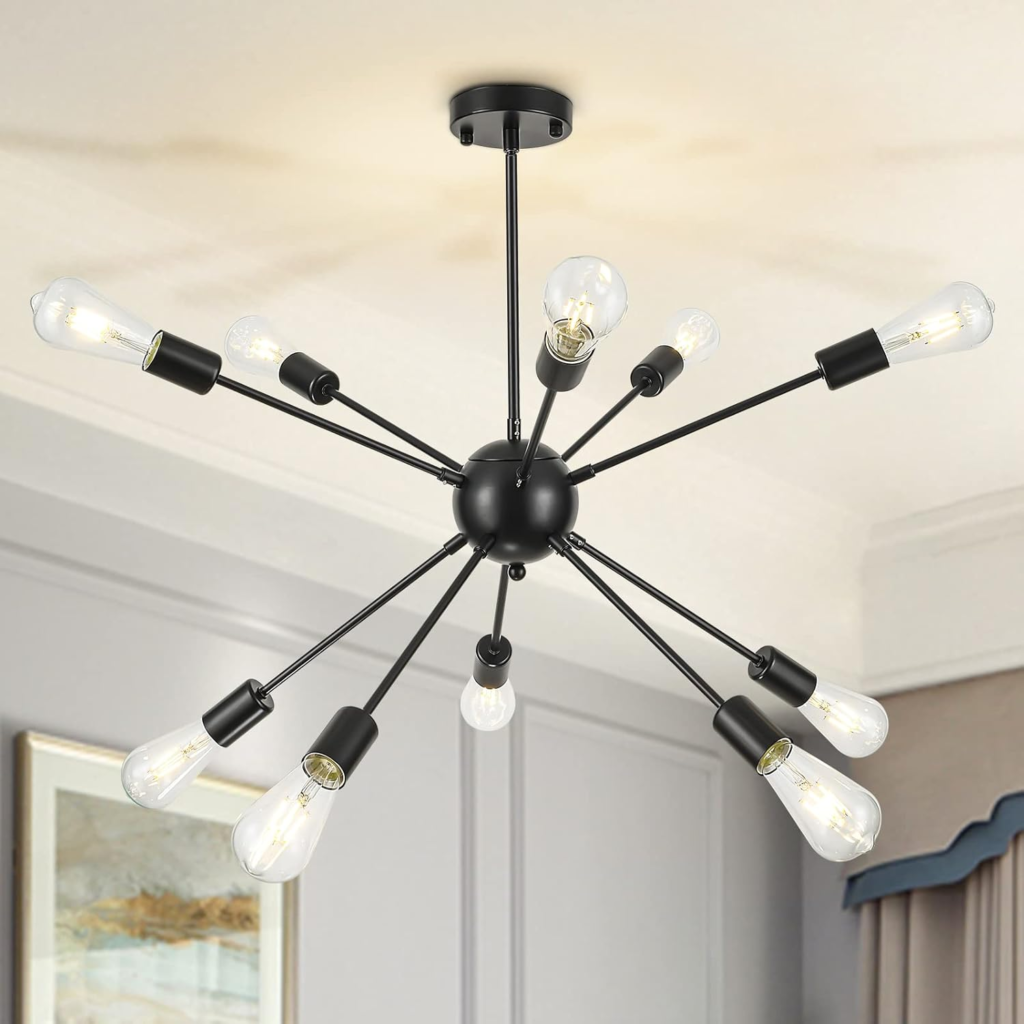
The starburst silhouette — eight arms radiating outward from a central sphere — creates visual drama whether it’s turned on or off. During the day it functions as sculptural decor. At night, the soft glow from each bulb casts warm ambient light that flatters both skin tones and painted walls alike.
One feature that professionals especially appreciate: pre-wired arms. Each of the eight arms arrives factory-wired to the central canopy, which dramatically simplifies installation. You’re connecting one set of leads rather than managing eight separate wiring runs. It’s the kind of thoughtful engineering that saves real time on job sites — and real frustration for homeowners tackling their first chandelier installation.
The chandelier also features an adjustable hanging height, with a stem that can be shortened or extended to suit ceiling heights ranging from standard 8-foot rooms to dramatic two-story entryways. Paired with warm 2700K bulbs, this fixture will make your wall colors — especially warm whites, taupes, and terracottas — look absolutely stunning.
Best For: Basements, kitchens, living rooms, and large open-plan spaces needing uniform coverage.
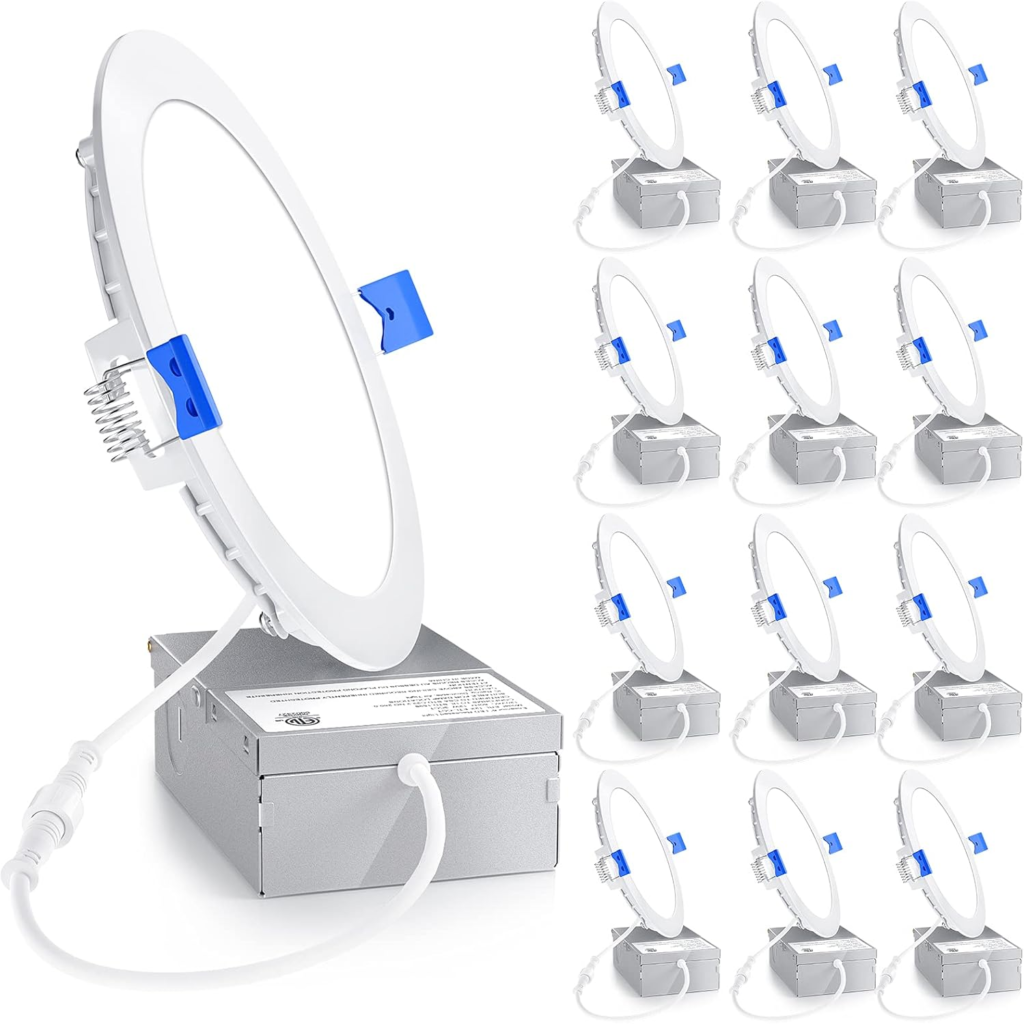
If you’re looking for the most versatile lighting solution on the market, the Ensenior 12-Pack is the answer. Recessed lighting has long been the professional’s choice for achieving clean, even illumination — and the Ensenior’s “canless” design brings that premium look to any budget without the bulky housing cans of traditional recessed kits.
The canless design means there’s no separate housing unit to install first. The fixture itself is the housing. This results in a smaller ceiling cutout, faster installation, and a sleeker finished appearance. For anyone retrofitting a finished basement — one of the most popular renovation projects in 2026 — this is the Best Recessed Lighting Kit for Basements on the market.
What truly sets the Ensenior apart is its 5-CCT (Correlated Color Temperature) versatility. Each fixture allows you to select between five distinct color temperatures: 2700K, 3000K, 3500K, 4000K, and 5000K. This gives you the flexibility to match the lighting precisely to your paint color and room purpose without purchasing different fixtures for different spaces.
Safety is equally impressive. Every unit in the 12-pack is IC-Rated, meaning it’s certified safe for direct contact with ceiling insulation. This isn’t a feature to overlook — non-IC-rated fixtures installed against insulation are a fire hazard. For peace of mind in any insulated ceiling space, IC-Rating is mandatory.
The Science of Color Temperature: Kelvins Explained
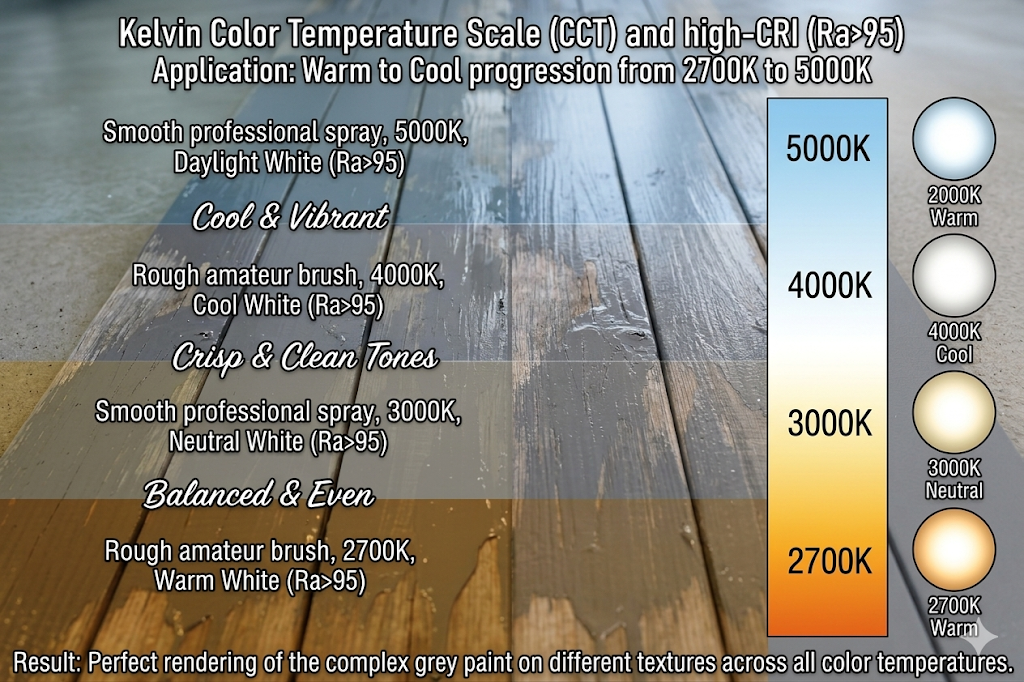
Color temperature is measured in Kelvins (K), and understanding this scale is the key to making your paint colors look their absolute best.
At 2700K, light is warm and amber-toned — similar to the glow of traditional incandescent bulbs. This temperature enhances warm paint colors beautifully. Think creamy whites like Benjamin Moore’s White Dove, warm greiges, terracottas, sage greens, and earthy tones. Use 2700K in bedrooms, living rooms, and dining rooms where warmth and relaxation are the goal.
At 4000K, you enter neutral territory — the light is neither warm nor cool, making it ideal for kitchens and bathrooms where you need accurate color perception without the harshness of daylight. Cool grays, crisp whites, and muted blues look especially sharp under 4000K.
At 5000K, the light mimics bright midday sunlight. This is the professional’s choice for home offices, studios, garages, and basements. It reveals every nuance in cooler paint palettes — icy blues, stark whites, and cool charcoals — and is the gold standard for task lighting.
Lighting installation is more approachable than most homeowners assume — as long as you follow the right safety steps.
Step 1: Kill the Power. Before touching any wiring, switch off the circuit breaker for the room you’re working in. Never rely solely on the wall switch — breakers are the only guarantee.
Step 2: Test with a Voltage Tester. After flipping the breaker, use an inexpensive non-contact voltage tester on the wires in the junction box. If the tester lights up or beeps, the circuit is still live. Stop and find the correct breaker.
Step 3: Identify Your Wires. In most U.S. homes, you’ll find three wires: black (hot), white (neutral), and bare copper or green (ground). Match these to the corresponding fixture wires — always connect black to black, white to white, and ground to ground.
Step 4: Use Push-Connect Terminals. Most modern fixtures, including the Ensenior recessed series, use Push-Connect wire terminals. Strip about ½ inch of insulation from each wire and insert into the matching terminal until it clicks. No wire nuts, no twisting — just a secure, professional connection in seconds.
Step 5: Secure and Test. Mount the fixture per the manufacturer’s instructions (Slide-to-Lock for the TALOYA, canless spring clips for the Ensenior), restore power, and test before closing the ceiling.
Troubleshooting & Maintenance
Flickering lights are almost always a compatibility issue between the LED driver and the dimmer switch. Most older dimmers were designed for incandescent bulbs. Replace them with a leading-edge LED dimmer (look for brands like Lutron Caseta or Leviton) for a smooth, flicker-free experience.
Buzzing or humming from dimmable fixtures is another sign of dimmer incompatibility. The same LED-compatible dimmer swap usually resolves this instantly.
Fixture not responding to smart controls? Confirm the fixture is connected to a 2.4GHz Wi-Fi band — most smart LED panels don’t support 5GHz networks.
For dust and maintenance, turn off the fixture and wipe down the lens or diffuser every 2–3 months with a microfiber cloth. Dust buildup on recessed trim rings can reduce light output by up to 10% over time and creates unsightly shadows on your freshly painted walls.
Conclusion: Complete the Room, One Layer at a Time
Great lighting doesn’t just illuminate a room — it validates every paint decision you’ve made. The TALOYA delivers sleek, high-CRI brilliance for bedrooms and offices. The BAALAND Sputnik brings sculptural style and warm ambiance to dining rooms and entryways. And the Ensenior 12-Pack gives you flexible, IC-Rated recessed coverage for every large space in your home.
Each of these fixtures is available on Amazon, and upgrading even one room can transform how you experience your home’s color palette — day and night.
👉 Ready to upgrade your lighting? Shop all three recommended fixtures using the affiliate links above and brighten every room the right way in 2026.
Published on thepaintly.com | Interior Design & Home Renovation | Updated for 2026
Looking to refresh your ceiling fan on a whim? With the best spray paint for ceiling fans, a humble fan can turn into a stylish accent. Whether you’re asking “can you paint ceiling fans?” or intrigued by spray paint ceiling fans blades, this guide balances creativity, function, and real user perspective. Why Painting Ceiling Fan…
When choosing the best black paint for exposed basement ceiling, you’re looking for something that hides imperfections, brings a cohesive look to exposed joists and ducts, and stands up to dusty conditions. A flat black ceiling can visually recede, giving the room a clean, industrial feel, even if the space is unfinished. This guide covers…
By thepaintly.com | Modern Lighting Design Series Introduction: Why Your Ceiling Light Is Ruining Your Productivity (and Your Zoom Calls) If you’ve ever finished a long workday with burning, tired eyes — or received a comment that you look “washed out” on video calls — your overhead lighting is almost certainly the culprit. As remote…
How to Limewash Walls: Step-by-Step Guide for Beginners (2026) Updated April 26, 2026 · 11 min read · By ThePaintly Editorial Team Learning how to limewash walls is one of the most rewarding DIY paint projects you can take on. The finish looks like it took a professional three days to achieve — but the…
When it comes to refreshing your ceiling, choosing the best zero VOC ceiling paint is a smart move for cleaner air and a healthier home. In this post, we’ll explore what “zero VOC” really means, share top-rated paint options with honest pros and cons, and include helpful tips and links—not just for your ceiling but…
Best Washable Ceiling Paint: 7 Scrub-Proof Picks (2026) Updated June 2026 · By Sophie Ulman The 7 Washable Ceiling Paints That Actually Survive a Scrub Here is the trap most people fall into: they buy a cheap flat ceiling paint, wipe a coffee splatter off it six months later, and end up with a shiny…


Great content with useful ideas.
I was skeptical at first about ipl live 2026 but pleasantly surprised tbh. been using it daily now
Great article that’s easy to understand.
The site continues to be surprisingly useful. https://manual1.pp.ua/