How to Repair Chipped Paint on Walls and Trim
You repair chipped paint by scraping the loose edge back to solid material, filling the gap so it sits flush, sanding it smooth, and repainting it in a matching sheen. Skip the sanding step or the sheen match, and the patch shows under side light within a week. What you reach for next depends on what actually chipped. Paint flaking off drywall behaves nothing like paint knocked off a wood baseboard, and the wrong filler on either one just repeats the chip by spring.
The habit that saves me the most time when I repair chipped paint is a labeled jar with half a cup of leftover paint, filled right after I finish any room. A chip turned up on a ceiling I’d painted back in 2022. Because that jar was sitting on the shelf, the fix took about four minutes and is invisible today. Without it, matching a four-year-old ceiling color would have meant repainting the whole room, not touching up one spot. Our guide to what to do with leftover paint covers how to keep that jar usable for years.
This guide covers the five tools I actually reach for to repair chipped paint on walls and trim: two fillers, a sanding sponge, a spot primer, and a mini roller. Then comes the seven-step sequence that keeps a patch from flashing or standing out a year later. Most chipped paint repairs take one afternoon start to finish.
What’s on this page
The Two Decisions That Matter Before You Patch
Everything else on this page is detail. These two calls decide whether you repair chipped paint once, or chase the same chip through another repaint next season.
Decision one: what actually chipped — the paint film, or what’s under it?
Run a fingernail under the edge of the chip. If a flake lifts cleanly off a hard surface underneath, that’s an adhesion failure. The paint film let go, but the drywall paper or the wood is still sound — fill it thin, sand, and repaint. If the fingernail finds a soft crumble or a gouge into the drywall paper or wood, the chip took substrate with it. A thin fill will sink there and show a shadow within a month.
Moisture and impact cause most of what I see. A chip near a baseboard that keeps coming back points to a vacuum or a chair leg, not a bad paint job. A chip that’s soft and slightly swollen at the edge points to water. Painting over it without finding the source just hides the problem for a season.
Decision two: wall or trim — because the fix isn’t the same product
Wall paint is almost always flat, eggshell, or satin latex over drywall. That calls for a gypsum-based spackling paste, feathered with a sanding sponge, and matched in the same low sheen. Trim and doors are semi-gloss or gloss enamel over wood instead. That needs a wood filler that bonds to bare grain and cures hard enough to survive a door bumping into it. Our pro tips for trim painting cover the brush work once the patch is filled, and if the trim is PVC rather than real wood, our guide to painting PVC trim covers that substrate instead.
If the chip on painted trim is smaller than a dime, a touch-up paint pen is often faster than mixing filler at all. See our touch up paint pen picks before you reach for a putty knife on something that small.
Quick Picks to Repair Chipped Paint at a Glance
Five tools, one for each stage of the repair. Most jobs only need two or three of them — the wood filler is only for trim, and the mini roller only matters if the surrounding coat was rolled on, not sprayed.
| Product | Stage | Best for |
|---|---|---|
| DAP DryDex Dry Time Indicator Spackling | Fill (walls) | Drywall and plaster chips under a quarter in size |
| Elmer’s Carpenters Interior Wood Filler | Fill (trim) | Baseboards and door casing chipped down to bare wood |
| 3M Drywall Sanding Sponge, Fine/Medium | Smooth | Feathering the patch edge so it doesn’t show a ridge |
| Zinsser Bulls Eye 1-2-3 Plus Spray Primer | Prime | Sealing filler so the topcoat doesn’t flash dull |
| J.R. Edwards Flocked Foam Mini Roller | Blend | Matching the roller texture of the surrounding wall |
The Five Products I Actually Use for This Repair
Best First Fix for Drywall Chips
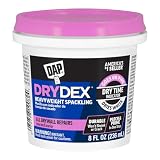
DAP DryDex Dry Time Indicator Spackling, 8 oz
This is the one I reach for on almost every wall chip, and the reason is the color change, not the formula. The paste goes on pink and dries white. You’re not guessing whether a thin fill is actually cured — you look at it. Most chipped paint spots on drywall are shallow enough that one thin coat handles the whole repair, and you can feather the edges while it’s still workable.
So the one thing I’d tell a first-timer: resist the urge to pile it on thick to save a step. A thick fill stays pink in the center long after the edges have gone white. Sand before the center is fully cured and it crumbles, and you’re starting over. Two thin coats, twenty minutes apart, beat one thick one every time.
- Pink-to-white cue removes the guesswork on dry time
- Sands to a smooth, paintable finish
- Cheap relative to the repaint it prevents
- Shrinks slightly on fills deeper than about 1/8 inch
- Not rated for exterior or high-moisture areas
Best for: drywall and plaster chips under a quarter in size, filled in one or two thin passes.
Via Amazon.com
Best for Chipped Baseboards and Door Casing
Elmer’s Carpenters Interior Wood Filler, 16 oz
Spackling paste is built for gypsum, and it never fully hardens the way wood filler does. Press a fingernail into cured spackle on a baseboard corner and you’ll leave a mark within a year. Elmer’s bonds to the bare wood a chip exposes once it knocks through the paint film. It also cures hard enough to take a vacuum bumping into it without crumbling again.
The one place I’ve been caught out: a deep fill right on a door edge that gets knocked and flexes. Wood filler isn’t flexible, and on that specific spot it can pop free after a season where a more forgiving product wouldn’t. For a chip in the middle of a flat baseboard face, I haven’t had that problem. My guide to best paint for baseboards covers the enamel that goes over it once the filler’s cured.
- Bonds to bare wood, not just the paint film
- Cures hard enough for high-traffic baseboards
- Paints over cleanly with latex or enamel
- Not flexible, so deep fills on door edges can crack free
- Dries lighter than stained wood, so it’s for painted trim only
Best for: baseboards, door casing, and window stools chipped down to bare wood.
Best for Feathering a Patch Invisible
3M Drywall Sanding Sponge, Fine/Medium 2-Pack
A flat ridge around a patch is the single most common reason a careful repair still shows up under a side lamp. The dual-grit sponge is what fixes that. The medium face levels the fill fast, and you flip to the fine face to feather the outer inch or two down to nothing — something flat sandpaper on a hard block can’t do around a baseboard profile or a corner.
So for anything that isn’t a flat wall — door casing with a routed edge, a corner bead, a window stool — the sponge contours in a way paper won’t. The one place it falls short is a deep gouge. Sanding a half-inch-deep hole flat would take all afternoon. That’s a job for a putty knife and a second fill pass first, then the sponge for the final feather.
- Contours around trim profiles and corners
- Washable and reusable across several patches
- Fine face won’t scuff the surrounding paint
- Wears out faster than paper on heavy compound
- Too slow for leveling a deep gouge on its own
Best for: feathering the outer edge of any patch so it blends instead of showing a ridge.
Best for Stopping a Patch From Flashing
Zinsser Bulls Eye 1-2-3 Plus Spray Primer, White, 13 oz
Dried filler is porous, and paint applied straight over it soaks in at a different rate than the surrounding wall. That’s what causes flashing — a dull or shiny patch-shaped spot that shows even when the color is a perfect match. One light coat of this primer seals the filler so the topcoat lays down at the same sheen as everything around it. That matters more in satin and semi-gloss rooms than in flat ones.
For anything bigger than a spot repair, our guide to how to use primer covers when a full coat beats a spray can. For a single chip, the aerosol gives you control a brush can’t. You’re priming an area the size of a coin, not a wall.
- Blocks the filler’s flat sheen from flashing through
- Fast recoat keeps the job to one visit
- Aerosol control for a spot the size of a quarter
- White only, so very dark walls need a tinted primer instead
- Overspray drifts, so mask tight around the patch
Best for: spot-priming any filled chip before matching paint goes on, especially in satin or semi-gloss rooms.
Best for Matching Wall Texture Over a Patch
J.R. Edwards Flocked Foam Mini Roller, 4-Inch, 2-Pack
Most walls are rolled, not brushed, and a roller leaves a faint stipple texture that a brush simply doesn’t reproduce. Touch up a patch with a brush and you get a flat, smooth halo around the repair — one that’s more visible than the chip ever was. A 4-inch mini roller matches that stipple on an area this size, without the overspray or masking a full-size roller needs.
So I keep a pack of these specifically for touch-ups and never use them for anything else. Foam loads less paint than a nap roller and holds a worse edge after one full wall. For a coin-sized patch, that’s exactly the limitation you want. It keeps the paint on the repair instead of blending three feet past it.
- Matches roller stipple instead of leaving a brush halo
- Cheap enough to dedicate one per paint color
- Small size keeps paint on the patch, not past it
- Holds less paint, so bigger patches mean more reloading
- Can leave tiny bubbles if overloaded
Best for: blending a patch into any wall that was originally painted with a roller — which is most walls.
Pro Tips From the Patch
Do the fingernail test before you buy anything. A clean flake off a hard surface is a thin fill. A soft crumble or an exposed wood splinter means you’re filling a gouge, not a chip, and you’ll want the wood filler, not spackle.
Wipe dust off before you feather. Sanding leaves a fine haze around the patch, and paint rolled over that haze doesn’t bond the same way it does on clean paint — our guide to how to clean walls before painting covers the quick wipe-down that fixes this.
Test your paint match on a hidden spot first. Even an exact can code can dry a shade off if the old coat has sun-faded. A swipe behind a door frame tells you in five minutes, before you commit to the visible patch.
Feather wider than feels necessary. A patch that’s filled flush but only blended an inch out still reads as a slightly different texture. Blend the paint two to three inches past the edge of the fill.
Let the fill cure fully before you prime. Priming over filler that’s still slightly soft traps moisture under the primer coat, and that’s exactly the spot that chips again first.
Renovation Stage: REPAIR
This job lives or dies at the diagnosis stage, not the paint stage. Figuring out whether you’re dealing with a thin adhesion flake or a gouge into the substrate decides every product choice after it, and no amount of careful painting fixes a filler pick made for the wrong surface.
How Much Filler Will You Need?
Enter how many chips you’re fixing and roughly how big each one is. This assumes one thin fill pass per chip, which covers most wall and trim repairs.

Photo by Krakograff Textures on Unsplash
Choosing the Right Filler for Chipped Paint
You’re choosing on four things when you repair chipped paint, in this order. Brand comes last, not first.
Depth and substrate decide the filler, not the brand
A thin flake off drywall paint calls for lightweight spackling. A gouge that exposed the gypsum paper, or any chip on wood trim, calls for a filler built to bond to that specific substrate. Using drywall spackle on bare wood trim is the single most common reason a patch on a baseboard fails within a year. It was never meant to grip wood grain.
How much do dry time and shrinkage change your approach?
Lightweight spackling shrinks a little as it dries. That’s fine on a thin fill and a problem on anything over an eighth of an inch deep. For deeper chips, plan on two thin passes rather than one thick one. A thick single pass dries unevenly, shrinks more at the center, and often needs a third pass to true it up anyway.
Sheen match matters as much as color match
This is the one people skip and then wonder why a “perfect” color match still shows. Flat paint over a glossy patch, or satin over a flat one, catches light differently even when the pigment is identical. Spot-prime the filler first so it absorbs paint the same way the surrounding wall does. Then match the sheen on the can label, not just the color name.
When do you actually need to prime a patch?
Skip priming on a hairline fix with almost no filler, where one coat of topcoat covers fine. Prime any patch with visible filler, any repair on a wall painted in the last two years that’s still curing, and anything going under satin or semi-gloss, where flashing shows the most. Our best drywall primer guide goes deeper if you’re patching more than a spot or two.
When NOT to Patch Chipped Paint Yourself
The house was built before 1978. The EPA Renovation, Repair and Painting rule applies to disturbing paint on pre-1978 housing, and sanding or scraping old paint without testing it first is exactly the kind of disturbance the rule covers.
The chip is soft, swollen, or keeps coming back in the same spot. That’s a moisture problem, not a paint problem. Filling over an active leak just hides it until the patch fails again, usually within a season.
What you’re calling a “chip” is actually a crack that runs through the wall. A crack that follows a seam or a corner is a structural or drywall-tape issue. Spackling paste will not hold a moving crack — that needs a proper drywall repair first.
How to Repair Chipped Paint in 7 Steps
1. Scrape the loose edge back to solid paint
Run a putty knife under the chip and scrape until nothing lifts. Filling over a flake that’s still loose just buries a failure that will push back through within weeks.
2. Clean the area and feather-sand the edges
Wipe off dust and grease, then lightly sand an inch or two around the chip so the edge isn’t sharp. A feathered edge blends; a hard edge always leaves a visible line no matter how well the fill goes on.
3. Fill the chip in one or two thin passes
Press the filler in with a putty knife, slightly overfilling, and scrape it close to flush. On anything deeper than an eighth of an inch, let the first pass dry and add a second thin layer rather than piling it on at once.
4. Let it cure, then sand it flush
Wait for the full color change or dry-to-touch signal on the label, not just a surface feel. Sand with the medium face of a sanding sponge to level it, then the fine face to feather the perimeter smooth.
5. Spot-prime the patch
One light coat over the filler, feathered slightly onto the surrounding paint. This is the step that stops the patch from flashing a different sheen once the topcoat goes on.
6. Match and test your paint
Match by the can’s formula code if you have it, or by brushing a hidden test swatch and comparing it in daylight. Sun-faded walls often need a shade lighter than the original code to look right.
7. Blend the topcoat with a mini roller
Roll the patch and two to three inches past its edge, feathering the pressure off as you move outward. Let it dry fully before deciding whether it needs a second thin coat — most single-chip repairs don’t.
The Verdict
If it’s one or two small chipped paint spots on a drywall wall, buy the DryDex spackling, a sanding sponge, and a mini roller. You’ll be done in an afternoon. If the chips are on baseboards or door casing, swap in the Elmer’s wood filler and skip straight to the enamel once it’s cured.
And if the chips show up across a whole wall rather than in one or two spots, that’s a case for a fresh coat, not a dozen patches that will all show their edges eventually.
Questions I Get Asked About Repairing Chipped Paint
How do you repair chipped paint on walls?
To repair chipped paint on walls, scrape the loose paint back to a solid edge, fill the gap with a lightweight spackling paste, let it cure, and sand it flush with a fine-grit sponge. Prime the dried filler with a light coat so it doesn’t flash a different sheen, then roll on matching paint two to three inches past the patch edge.
What products do you need — spackling or wood putty?
Use spackling paste on drywall and plaster, and wood filler on anything that chipped down to bare wood, like a baseboard or door casing. Spackling never fully hardens the way wood filler does, so it won’t hold up to the knocks trim takes.
Do you need primer for chipped paint?
Yes, for any patch with visible filler in it. Dried filler is more porous than the surrounding paint. Skipping primer usually leaves a dull or shiny patch-shaped spot even when the paint color is an exact match.
How do you match wall paint color for a touch-up?
Start with the original can’s formula code if you saved it. If not, brush a small test swatch in a hidden spot and compare it in daylight. Sun exposure fades walls unevenly, so a four-year-old wall often needs a shade lighter than the original code to blend.
How do you sand and feather chipped paint smoothly?
Use the medium face of a sanding sponge to level the dried filler flush with the wall, then switch to the fine face and work the outer inch or two down to nothing. Feathering wider than feels necessary is what keeps the patch from reading as a slightly different texture.
When is spackling paste enough versus joint compound?
Spackling paste is the right call for a single chip or small hole because it dries fast and shrinks less on thin fills. Joint compound is better for large areas or multiple seams. It’s cheaper in bulk but takes longer to dry and shrinks more, often needing a second coat.
Can you use touch-up paint pens on walls?
On a bare chip, no — a pen only adds color, not the filler a chip needs to sit flush. Pens work well for very small painted-trim marks that didn’t lose material, but a wall chip still needs spackling and sanding first.
How long does filler dry before you can paint over it?
A thin fill of lightweight spackling is usually ready to sand in about 30 minutes and ready for primer the same day. Thicker fills or wood filler on deep gouges can take several hours. Rushing a coat over filler that’s still soft is what causes repeat chips at the exact same spot.