Best Brush for Ceiling Paint: 3 Picks, No Drips (2026)
Updated: July 2026 | By Sophie Ulman
The best brush for ceiling paint is not the one on the endcap display — it is the one that keeps your arm from shaking by minute ten. Ceilings punish bad tool choices in a way walls never do. You are working overhead, against gravity, under a work light that shows every missed spot. Pick the wrong brush and you get lap marks, a stiff shoulder, and a cutting-in line that wanders. I have painted enough ceilings, in enough awkward rooms, to know that the brush matters as much as the paint you load it with.
Below are the three brushes I actually keep in my kit for ceiling work, sorted by the job they solve, plus the paint pairing and prep steps that make any of them perform. If you want the full rolling technique once the edges are cut, my guide to painting a ceiling covers that half of the job.
Quick Picks
Each of these was chosen for a specific ceiling scenario — a high vaulted room, a tight crown-molding line, or a rough garage-floor-style overhead surface.
| Brush | Bristle / Size | Best for | Watch out for |
|---|---|---|---|
| Purdy Clearcut Angle Sash 2.5″ | Angled nylon/polyester, stiff | Crisp cut-in lines on smooth ceilings | Sheds slightly if you press too hard |
| Wooster Shortcut Angle 2″ | Angled, short handle | Tight corners and crown molding | Short handle means more ladder trips |
| Mr. Brog 3″ Angled Brush | Wide angled, natural bristle | Fast coverage on textured or garage-style ceilings | Heavier — tiring overhead for long sessions |
The 3 Best Brushes for Ceiling Paint, Reviewed
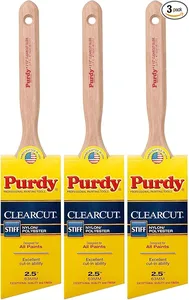
Purdy Clearcut Angle Sash 2.5″
This is the brush I reach for first on any smooth drywall ceiling. The angled tip is stiff enough to hold a line without flexing, so the cut-in edge where the ceiling meets the wall comes out straight without a second pass. It holds a decent paint load for its size, which matters overhead — you want fewer trips back to the tray, not more.
The honest limitation: if you load it heavy and lean into a stroke, a few bristles will let go, especially in the first couple of uses before it breaks in. Rinse it well after every session and it settles down fast.
Pros
- Holds a straight cut-in line without flexing
- Good paint capacity for the size
- Comfortable grip for extended overhead use
Cons
- Sheds a few bristles if overloaded early on
- Needs a full rinse between sessions to stay tight
Best for: smooth drywall ceilings where a crisp, straight cut-in line against the wall matters most.
Via Amazon.com
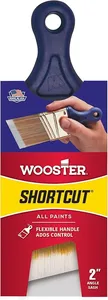
Wooster Shortcut Angle 2″
The short handle looks like a downgrade until you actually work a corner with crown molding or a tight closet ceiling. The stubby grip lets you get your hand closer to the bristle tip, which buys you precision in spots a full-length brush handle simply cannot reach without banging into the wall.
The trade-off is real: that same short handle means you cannot cut in a long straight run without repositioning your ladder more often than you would with a longer-handled brush. On an open ceiling with no obstructions, I will switch to the Purdy instead.
Pros
- Excellent precision in corners and moldings
- Fits nicely in the hand for fine control
- Angled tip cuts clean lines around obstructions
Cons
- Short handle means more ladder repositioning
- Not the fastest choice for long open runs
Best for: ceilings with crown molding, tight corners, or closets where reach matters less than precision.
Via Amazon.com
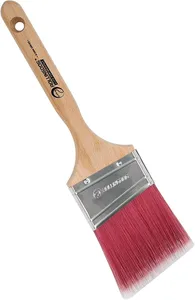
Mr. Brog 3″ Angled Paint Brush
Wider means faster, and on a textured or garage-style ceiling — where you are pushing paint into peaks and valleys rather than laying a smooth film — that extra width covers ground quickly. I used this on a garage ceiling with light orange-peel texture and finished the cut-in perimeter in about two-thirds the time the Purdy would have taken.
What it costs you is arm fatigue. It is a heavier brush loaded with more paint, and holding that weight overhead for an hour-plus session will tire your shoulder faster than either of the other two. I take breaks every fifteen minutes when I am using it for a full ceiling.
Pros
- Covers more area per stroke
- Fills texture and minor irregularities well
- Natural bristle holds a heavier paint load
Cons
- Heavier — tiring for long overhead sessions
- Less precise than the two angled options above for fine lines
Best for: textured, garage-style, or older ceilings where speed and coverage matter more than a razor-thin cut line.
Via Amazon.com
Pro Tips From the Ladder
Wet the bristles before you dip. A quick rinse and squeeze-out on a natural or blended bristle brush stops it from soaking up more paint than it can control on the first load.
Load a third of the bristle length, not the tip. Overloading is the single biggest cause of drips landing on your face and the floor below.
Cut in a whole wall’s edge before you switch to the roller. Dried cut-in lines show through a rolled finish — keep the edge wet by finishing the perimeter in one pass.
Renovation Stage: PAINT
Brush selection happens in the PAINT stage, right before the roller comes out. Prep matters more than the brand here — a mid-priced brush used on a clean, dust-free ceiling with the right bristle stiffness outperforms a premium brush fighting drywall dust or old grease film.
Ceiling Cut-In Time Calculator
Estimate how long the cut-in perimeter will take based on your room size, so you can plan brush breaks before your arm gives out.
How to Choose the Best Brush for Ceiling Paint
Three things decide whether a brush works overhead: bristle stiffness, handle length, and width. Get these three right for your ceiling type and the brand on the handle stops mattering nearly as much as the marketing suggests.
Bristle stiffness: match it to your ceiling texture
A stiff, angled synthetic bristle — nylon/polyester blends like the Purdy above — holds a straight line on smooth drywall. A softer or wider bristle moves more paint into texture but sacrifices precision. If your ceiling is smooth and freshly finished, go stiff and angled. If it has any orange-peel, knockdown, or popcorn-adjacent texture, a wider, heavier-loading brush like the Mr. Brog closes the gap faster.
Handle length: reach versus control
A longer handle gives you reach and lets you cut a longer run without repositioning the ladder. A short handle, like the Wooster, trades that reach for control in corners and around obstructions like crown molding or ceiling fixtures. According to Family Handyman’s brush selection guide, matching handle length to the specific cutting task — not buying one brush for the whole house — is what separates a clean ceiling job from a patchy one.
Width: speed versus fatigue
A 2.5–3 inch angled sash brush is the standard ceiling width. Go wider and you cover more ground per stroke but add weight that tires your shoulder faster overhead. Go narrower and you are making more passes than necessary. For most ceilings, the 2.5-inch size hits the balance point between speed and control.
Paint pairing matters as much as the brush
A flat or matte ceiling paint hides the minor imperfections a brush inevitably leaves better than any sheen with reflectivity. This Old House’s ceiling painting guide notes that flat white ceiling formulas are built with higher viscosity specifically to resist dripping during overhead brush and roller work — a standard wall paint will run off the bristle before you can lay it down. Pair whichever brush you pick with a dedicated ceiling paint, not leftover wall paint.
Prep still comes first
No brush compensates for a dusty or greasy ceiling. Run through how to clean walls before painting — the same routine applies overhead — before you load the first brush. And if you are trying to get the whole job done in a single day, my notes on how to make paint dry fast cover the airflow and additive tricks that let you recoat sooner.
When a Brush Is the Wrong Tool
Don’t brush an entire large, open ceiling from scratch. A brush is for cutting in the perimeter and tight spots — the open field of a 12×12 room or larger should go to a roller on an extension pole. Brushing the whole field takes triple the time and rarely looks as even.
Don’t use a natural-bristle brush with water-based latex ceiling paint. Natural bristle absorbs water and goes limp, killing your line control. Save natural bristle for oil-based products only; use synthetic nylon/polyester blends for latex.
Don’t skip the ladder for reach. Stretching a short-handled brush past a comfortable arm length is how cut-in lines wander and how people fall off ladders. If you cannot reach it standing flat-footed, move the ladder.
The Verdict
For most ceilings, the Purdy Clearcut Angle Sash 2.5″ is the best brush for ceiling paint — it holds a clean line on smooth drywall and it is the one I reach for first. Tight corners and crown molding go to the Wooster Shortcut. Textured or garage-style ceilings move faster with the wider Mr. Brog 3″. Two thin coats, a clean brush rinsed between sessions, and the right bristle for your ceiling texture beat any single “best” brush working alone.
Frequently Asked Questions
What is the best brush for ceiling paint?
An angled synthetic sash brush in the 2.5–3 inch range is the best brush for ceiling paint on smooth drywall. The angled tip holds a straight cut-in line where the ceiling meets the wall, and synthetic bristle handles water-based latex ceiling paint without going limp.
Should I use a brush or roller for a ceiling?
Both — a brush cuts in the perimeter and tight corners first, then a roller on an extension pole covers the open field. Brushing an entire large ceiling by hand takes far longer and rarely looks as even as a rolled finish.
What size brush is best for cutting in a ceiling?
A 2.5-inch angled sash brush is the standard size for ceiling cut-in work. It is wide enough to move quickly but narrow enough to control precisely along a wall-to-ceiling line.
Do I need a natural bristle or synthetic brush for ceiling paint?
Synthetic nylon/polyester blends for latex or acrylic ceiling paint — the most common type used indoors. Natural bristle is reserved for oil-based products; it absorbs water and goes limp with latex paint.
How do I stop my ceiling brush from leaving lap marks?
Keep a wet edge by cutting in one wall’s full length before it starts to dry, load only a third of the bristle length so you are not overloading the stroke, and finish each section before moving to the next rather than going back over a partially dried line.
Why does my ceiling paintbrush shed bristles?
New brushes, especially stiffer angled synthetics, can shed a few loose bristles in the first couple of uses before they break in. Rinse thoroughly after each session, and avoid pressing hard enough to flex the ferrule — that is what pulls bristles loose.