
Best Way to Paint a Popcorn Ceiling (Without Causing any Damage)
Popcorn ceiling? What’s that? Well, you can also call it a stipple ceiling, stucco ceiling, or brittle ceiling. In the 1960s and 1970s, popcorn ceilings was the best ceiling paint design and a fashion, or you can say a common interior trend. The texture was simple and the easiest way to hide any imperfections in drywall and plaster ceilings, and it didn’t need any paint afterward.
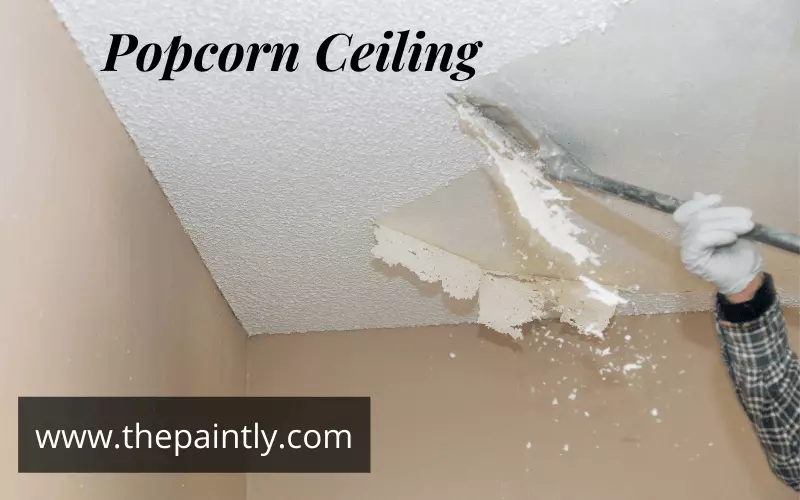
However, the popcorn ceiling’s rough texture attracts and traps dust and cobwebs, making it difficult to transform or renew your ceiling. Well considering what is the best way to paint a popcorn ceiling can be a difficult task, even though you haven’t considered it before.
Related Post: Best way to paint a ceiling
If you don’t know the best way to paint a popcorn ceiling, you will make a great mess from texture breaking to ruining the entire thing almost. But, don’t worry! In this article, we have brought you the best way to paint your popcorn ceiling like a pro.
Essential tools and material
You will need some essential tools to trail the best way to paint popcorn ceiling and avoid any hassle in between, so note them down.
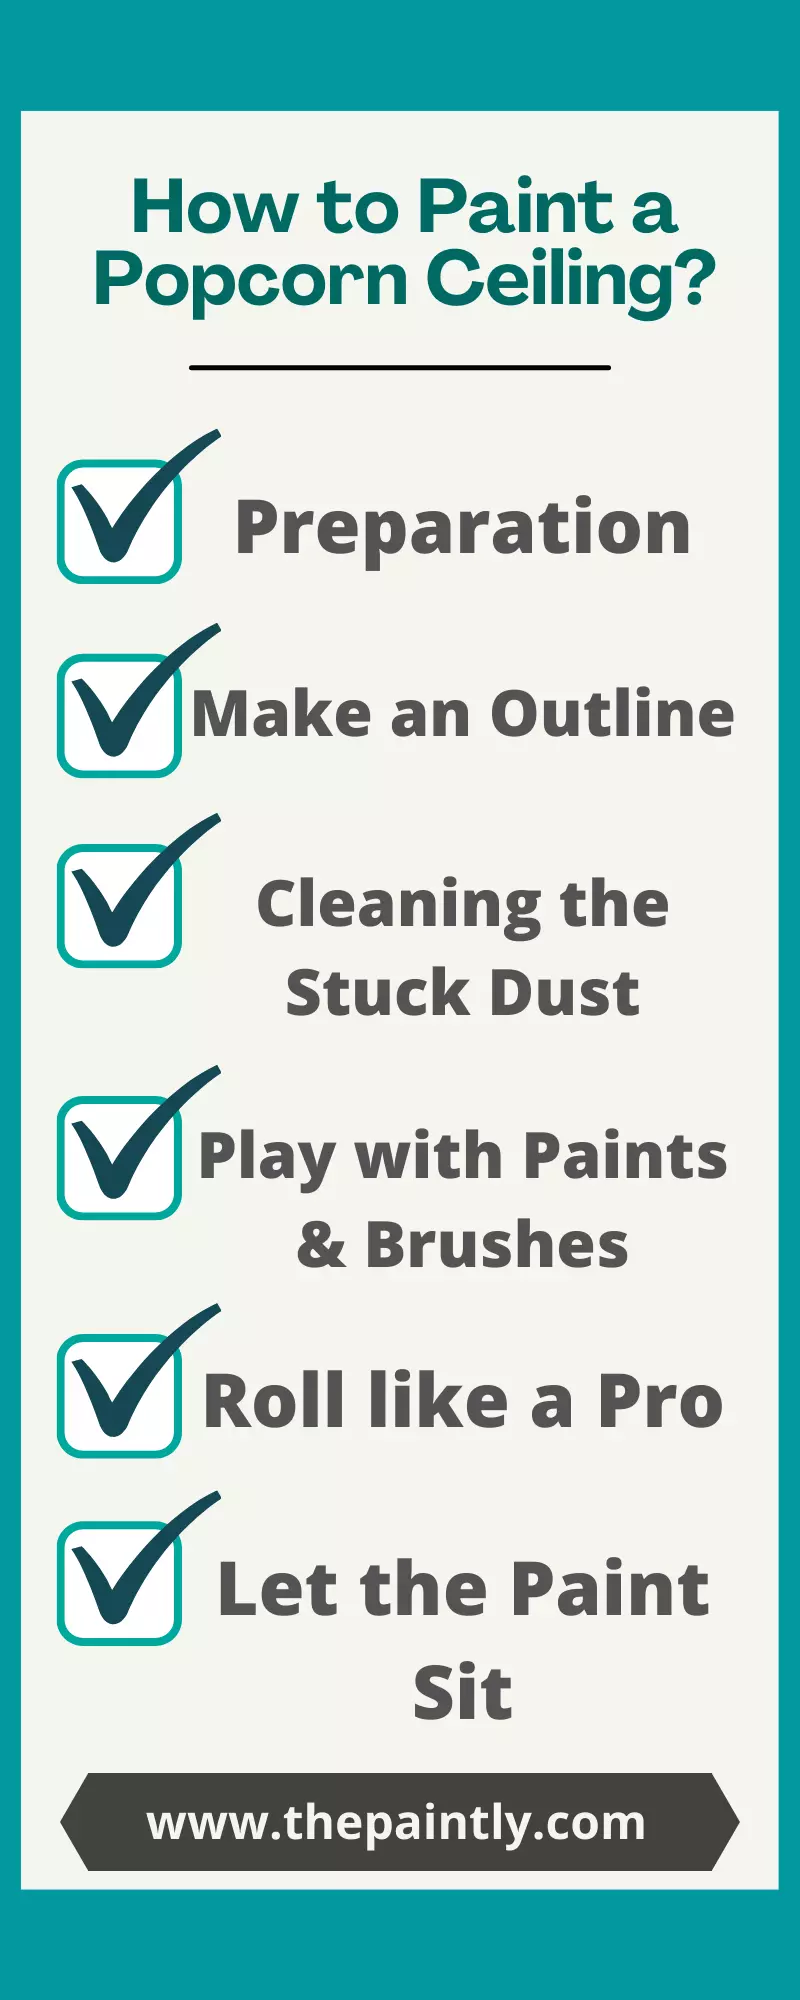
Step 1: Preparation
Firstly you need to prep your area. Gather all of your painting supplies and set up your space before starting painting. As the thickness of a popcorn ceiling can create many splash backs as you step on painting, prepare the space properly.
Begin by ensuring that your area is tidy and empty of anything that you can potentially remove. If the furniture cannot be shifted or moved, place the drop cloth in the center of the room and put all the furniture on it. Wrap plastic sheeting all around walls and use drop cloths to protect the surfaces. Use plastics and painter’s tape to cover and mask any ceiling fixtures.
Step 2: Make an outline
The next is like making the outline or frame so you can adopt the best way to paint popcorn textured ceiling. Prepare the ceiling edges to achieve the desired and finished look where the ceiling touches the wall. Put on the dust mask and carefully clean ¼ inches of the popcorn surface off the ceiling right along with the corners with a flathead screwdriver.
Experts Tip
If your home was constructed prior to 1977, when asbestos in textured ceilings was prohibited, always get ceilings checked beforehand to minimize the risks to operate on. If it has asbestos or lead, it’s smart to leave it alone or hire a specialist to take care of all that.
Step 3: Cleaning the stuck dust
It’s time to clean! It is vital to clean any surface properly before paint application. In the third step, you have to do that thing. To prevent dust from speckling the paint you add to the popcorn ceiling, use a feather or microfiber duster, or you can also use the vacuum with thin bristled dusting brush attachment to remove any dust from both nooks and corners.
Step 4: Play with paint and brushes
Now, get the brushes out! On an angled brush, cut in along the ceiling edge. Fill the brush to the fullest of the paint, but use a soft touch while applying it. Since the textured compound tends to fall off when wet, don’t overload either area; just apply paint gently and carry on. To get best textured ceiling paint finish, check if you don’t have complete coverage with one coat of popcorn ceiling coating, plan on doing a second coat.
Experts Tip
Popcorn and other textured textures take extra color to cover completely, so rely on using double as many as you would on a plain ceiling.
Step 5: Roll like a pro
et’s dive in to find best paint roller for popcorn ceiling! Start by using an extended napped roller cover to load tons of color in one move since you won’t like to bend again and again as it is a bit painful. So, instead of a rolling tub, get a 5-gallon bucket with a panel or a grid, which is what experts use to assure the roller is filled with paint. Fill the roller to the fullest and roll it over the ceiling in one direction only.
Step 6: Let the paint sit
Let set the paint as it’s the best way to paint a popcorn ceiling. Leave enough time for the first coat to dry according to the manufacturer’s directions, and afterward, roll a second coat in one loop only in a direction perpendicular to the very first coating. Both double coats can have the most even and seamless coverage across the entire ceiling, with the least amount of overhead for the most paint refresh.
Wrapping up
So, now you have successfully learned the best way to paint a popcorn ceiling. Hopefully, your painting task will now be successful. One more thing we want to say at the end is that if you notice any flaws, now is the time to resolve them while everything is still in place. If you pick it up and then notice a problem later, you’re unlikely to try to get your equipment out again, so you’ll just ignore it.


I found it helpful. Thanks
Accurate information. Keep up the good work..