The Best Way to Paint Edges Between Wall and Ceiling (Without Tape)
By Sophie Ulman · Updated August 2026
A wavy line where the wall meets the ceiling is the one mistake nobody stops seeing. The wall can be flawless, the roller work perfect, the color exactly right — and every guest who walks in still catches that shaky band above the light switch. The best way to paint edges between wall and ceiling is not the method most homeowners reach for. It is not tape. It is a loaded angled brush, a braced hand, and one continuous stroke, and it takes about twenty minutes of practice to learn.
The short answer
Paint the ceiling first and let it lap two inches down onto the wall. Then cut the finish line in freehand with a 2-inch angled sash brush, working in three-foot sections and rolling the wall within ten minutes so the band stays wet. Tape is the backup plan, not the plan.
Why That Line Comes Out Wavy in the First Place
Two things cause almost every bad ceiling line I have had to fix, and neither is a lack of talent.
The first is an overloaded brush. Paint runs to the tip, the bristles get heavy, and the moment you slow down the load dumps sideways over your line. People read the wobble as shaky hands. It is usually just too much paint on the brush.
The second is the corner itself. Walls and ceilings almost never meet in a true straight line — drywall compound builds up unevenly at the joint, and older plaster rolls in and out by an eighth of an inch across a single wall. Tape follows the flat surface. The joint does not. That gap is exactly where wall paint creeps under the tape edge and dries as a hard little fringe on the ceiling.
A brush handles that. Bristles flex into the low spots and ride over the high ones, so the line you cut follows the room instead of fighting it.
The First Ceiling Line I Taped Cost Me a Whole Evening
It was a bedroom with a lightly textured ceiling, and I taped the whole perimeter because I did not trust my hand yet. Two hours of careful taping, one coat of eggshell on the walls, and I peeled the tape expecting a razor line. What came off was a ragged blue-grey feather along every wall — the wall color had wicked through the texture under the tape in a hundred tiny places. I spent the rest of that evening on a ladder with a small brush and a quart of ceiling white, cutting the line back by hand. Which is exactly what I should have done in the first place.
Here is what I learned: tape does not create a clean edge. A sealed edge creates a clean edge. If the surface under the tape is not perfectly smooth and the tape is not sealed with the ceiling color first, tape actively makes the job worse — it adds two hours and still leaves you touching up.
The Best Way to Paint Edges Between Wall and Ceiling, Step by Step
1. Ceiling first, and let it run onto the wall
Paint the ceiling before you touch the walls, and deliberately carry the ceiling color about two inches down onto the wall all the way around. Do not try to be neat here. You are laying a base that the wall color will cover later. This is the step that turns a job with two fussy lines into a job with one, and skipping it is the most common reason people find the edge impossible. Our full ceiling painting guide covers the rolling sequence in detail.
2. Pour an inch of paint into a hand pail
Never cut in from the can. A full gallon is heavy, the rim fouls the bristles, and one bump on a ladder ruins a floor. Pour roughly an inch of paint into a small hand-held pail — enough to dip a third of the bristle length and no more.
3. Tap the brush, never scrape it
Dip a third of the bristles, then tap each face of the brush lightly against the inside wall of the pail. Scraping the brush across the rim strips paint out of the middle of the bristle pack, which is exactly where you want it — the load in the center is what feeds the tip through a long stroke. A scraped brush runs dry halfway across and you stop to reload mid-line. Every reload is a place the line can jog.
4. Set the line below it, then push up
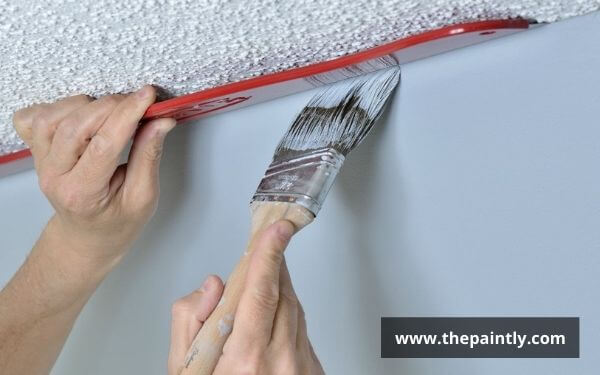
This is the part that separates a crisp edge from a wobbly one. Do not aim the brush tip straight at the corner. Start about a quarter inch below the ceiling line, brush held at a slight angle with the long point of the bristles up. Push gently until the bristles flare and the long point touches the ceiling line — then pull sideways in one long, slow, continuous stroke without lifting.
The flare is doing the work. You are not drawing a line with the tip; you are letting the loaded bristles lay one down while you steer. Move from the shoulder, not the wrist, and rest the heel of your hand or your little finger against the wall as a guide. A braced hand cuts a straighter line than a free hand every single time.
5. Work three-foot sections and roll behind yourself
Cut in a three- to four-foot run, then roll that section of wall before you cut the next one. If the cut-in band dries before the roller reaches it, you get flashing — a visible strip of slightly different sheen along the top of the wall, most obvious in daylight from the side. Ten minutes is roughly the window with a standard interior latex. On a hot dry day it is less.
Roll as close to the ceiling as the frame allows and let the nap lap into the wet cut-in band. That overlap is what makes the two textures read as one surface.
6. Two thin coats, always
Cut in coat one, roll coat one, let it dry, then repeat. Trying to get full coverage on the first pass is what makes people overload the brush, and an overloaded brush is what makes the line wander. Two thin coats always beat one thick coat — on cabinets, on siding, and on this line more than anywhere.
That is the whole method. The best way to paint edges between wall and ceiling is a sequence rather than a trick: ceiling first, light load, braced hand, short sections, two coats. Nothing in it requires a steady hand you were born with.
The Two Tools That Actually Change the Result
Prep and technique matter more than the brand — but the best way to paint edges between wall and ceiling still depends on one tool being right, because a cheap brush genuinely cannot cut a clean line. This is the one place I would not economize. The bristle tips on a budget brush are cut, not flagged, so they refuse to come to a point and the line comes out fuzzy no matter how steady your hand is.

BEST FOR FREEHAND CUTTING IN
Purdy XL Glide 2″ Angular Sash Brush
The bristles are a nylon and polyester blend with flagged, tapered tips, which is the detail that matters: flagged tips split into finer filaments at the end, so the brush comes to a genuine chisel point and holds it wet. That point is what lets you push the flare against the ceiling and still get a hard edge instead of a fuzzy one.
I keep a 2-inch for ceiling lines and a 2.5-inch for baseboards. The 2-inch is easier to control overhead on a ladder, where your arm is already working against gravity. Honest limitation: it is a stiffer brush than a pure nylon sash, so in a cold room with thick paint it drags — thin the paint slightly or let it warm up before you start.
Best for: smooth or lightly textured ceilings where you want to cut freehand and skip tape entirely.
Check Price on Amazon →Via Amazon.com
BEST FOR TEXTURED CEILINGS AND UNSTEADY HANDS
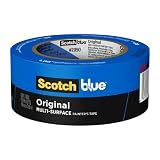
ScotchBlue Original Multi-Surface Painter’s Tape, 1.88 in
The adhesive is deliberately low-tack so it releases from fresh latex without pulling the film off with it — that is the whole reason painter’s tape exists rather than masking tape. Use the wide 1.88-inch roll here, not the narrow one: the extra width gives you something to hold onto while you press the edge down, and it catches roller spatter.
The limitation is the one I learned the hard way — tape alone does not seal against texture. Press it down with a putty knife, then run a thin bead of the ceiling color along the tape edge and let it dry. Any paint that wicks under is ceiling-colored and invisible. Then paint the wall. Pull the tape while the wall paint is still slightly soft, at a shallow angle back on itself.
Best for: popcorn and heavily textured ceilings, high-contrast color changes, and anyone working on a ladder who does not trust a freehand stroke.
Check Price on Amazon →Via Amazon.com
If you are buying brushes anyway, it is worth reading our ceiling brush comparison and the full ceiling tool list before you shop, so you are not paying twice.
Sheen Is Doing Half the Work You Think Your Hand Is
A flat ceiling next to an eggshell wall forgives a line that drifts by a sixteenth of an inch, because the two surfaces reflect light so differently that your eye reads the boundary as intentional. Put the same sheen on both sides and every deviation shows up under a window.
So if you are choosing paint and you are nervous about the edge, a dead flat ceiling paint is a real advantage, not just a matter of taste. It is also better at hiding drywall waves overhead. Our notes on flat ceiling paint and on picking a ceiling white go deeper on that trade-off.
How to Fix a Line You Already Botched
Do not wipe wet paint off the ceiling with a rag. On any textured surface the rag drives color into the low points and you turn a thin mistake into a grey smudge you cannot cover with one coat.
If the paint is still wet and the ceiling is smooth, wrap a damp — not soaking — cloth over the corner of a flexible putty knife and draw it along the line once. One pass, then rinse.
If it has dried, let it cure fully and recut the line from the other side: load your angled brush with the ceiling color and cut a fresh clean edge on top of the mistake, coming down onto the wall color slightly. You are drawing a new line rather than erasing an old one, and it is invisible when it is done. Ridges left by dried bleed-under need knocking down with a fine sanding sponge first — in a home built before 1978, check the EPA’s lead safety guidance before you sand anything, because old paint layers under that joint are exactly where lead lives. If drips ran down the wall while you were up there, our guide to fixing paint drips handles that separately.
When Freehand Is the Wrong Call
- Deep popcorn or heavy stipple. There is no flat plane to run a brush along. Tape it, seal the tape edge with ceiling color, and accept the extra step.
- Dark wall against a white ceiling in the same sheen. Maximum contrast punishes every millimetre. Tape and seal.
- You are working overhead on a ladder and your arm is shaking. A tired arm cuts a bad line. Stop, move the ladder more often, and cut shorter runs.
- Crown moulding is going up afterwards. Do not spend the evening on a line that a moulding will cover by an inch and a half.
- The joint is cracked or the drywall tape is lifting. Paint will not bridge it. Fix the joint first — a crack-hiding approach only helps once the movement has stopped.
One last thing, and it applies to every coating job I have ever done: prep matters more than the brand. Wipe the dust off the top of the wall before you cut. Dust is the reason a line looks crisp wet and grainy dry, and it takes ninety seconds to deal with. Family Handyman has been making the same point about surface prep for decades, and it holds.
Wall and Ceiling Edge FAQ
Should I paint the ceiling or the walls first?
Ceiling first, always, and let the ceiling color lap about two inches down the wall. The wall color then covers that overlap, so you only ever have to cut one accurate line instead of two.
Do I need tape to paint the edge between the wall and ceiling?
No. On a smooth or lightly textured ceiling, a 2-inch angled sash brush cuts a cleaner line than tape does, and faster. Tape earns its place on heavy texture, on high-contrast color changes, and when you do not trust your hand overhead.
Why does paint bleed under my painter’s tape?
Because the surface under the tape is not flat, so the adhesive never seals along the whole run. Press the tape with a putty knife, then paint a thin bead of the ceiling color along its edge and let it dry. Whatever wicks under after that is the same color as the ceiling.
What size brush is best for cutting in a ceiling line?
A 2-inch angled sash brush. Wider brushes hold more paint but are harder to steer overhead, and narrow ones run dry too fast and force reloads mid-stroke.
How do I fix a wavy line between the wall and ceiling?
Let it dry, then recut from the ceiling side with ceiling paint on an angled brush, coming slightly down onto the wall color. Do not wipe wet mistakes with a rag on a textured ceiling — it spreads the color into the texture.
Can I cut in the day before I roll the walls?
You can, but expect flashing — a band of slightly different sheen where the dried brushwork meets the rolled surface. Cut in three-foot sections and roll into them within about ten minutes for a uniform finish.
How wide should the cut-in band be?
Two to three inches. Narrower than that and the roller frame will not clear the ceiling without touching it; much wider and you are brushing a lot of wall that a roller would cover faster and more evenly.
About the author
Sophie Ulman has renovated and painted more rooms than she can count — and made every mistake in the book so you don’t have to. She focuses on real-world durability: not how products perform on day one, but whether the repair holds through a full seasonal cycle.
ThePaintly is reader-supported. Our picks are based on manufacturer specifications and what users report. When you buy through links on this site, we may earn an affiliate commission at no extra cost to you.
Why a Freehand Cut-In Beats Tape on a Wall-to-Ceiling Line
The junction between wall and ceiling is almost never straight. It is a plaster or drywall corner that was taped and finished by hand, and it wanders – sometimes by a few millimetres over a couple of metres. Tape follows that wander and then tells the truth about it, because a tape line lays down where the corner actually is, and any wobble in the corner becomes a wobble in your paint line.
A freehand cut-in does something tape cannot: it lets you cheat. Your eye reads a straight line, not a true one, so a brushed edge can be pulled gently straight across a corner that is not, and the result looks better than the wall deserves. Painters have been doing this for as long as there have been ceilings, and it is why professionals rarely tape this particular junction.
The mechanics come down to the brush and how much paint is on it. An angled sash brush, loaded about a third of the way up the bristles and tapped rather than scraped against the tin, holds enough paint to run a length without going dry halfway. The technique is to lay the paint on slightly below the line first, then come back with the edge of the brush and push it up to the corner in one continuous pull. Trying to hit the line on the first pass is what makes people wobble – you are steering and applying paint at the same time.
Speed matters more than people expect. A slow, careful stroke shakes; a smooth, committed one does not. The same principle applies as with drawing a straight line by hand, and it is why the second wall always looks better than the first. If a section goes wrong, let it dry rather than fixing it wet, then cut over it cleanly.
There is one situation where tape still wins outright, and it is worth naming: when the ceiling and wall colours are strongly contrasting and the corner is sharp and true. There, a taped and sealed edge gives a crispness that is hard to match freehand. On an ordinary painted corner between a white ceiling and a coloured wall, freehand is faster and looks straighter.
When to Reach for Tape Instead
Freehand is the default on this junction, but there are cases where taping is the better call.
- Strong colour contrast against a sharp, true corner. A sealed tape edge gives a crispness freehand struggles to match when the two colours are very different.
- Textured ceilings meeting smooth walls. The texture breaks up a brushed line. Tape – burnished and sealed with the base colour – handles it better.
- Coved or moulded junctions. A profile rather than a corner needs a different approach entirely; cutting freehand into a curve is much harder than into an angle.
- When you physically cannot get steady. Working at full ladder stretch or on an awkward stairwell, a taped line beats an unsteady hand every time. Safety first, then finish.
- On very glossy or previously enamelled surfaces. A brushed edge shows every correction on gloss. Tape and seal, then remove before the paint fully cures.