The Best Elastomeric Products for Bridging Interior Wall Cracks
Updated May 2026 · ThePaintly Editorial
Standard spackling fails for one simple reason: it’s rigid. When the wall expands in summer and contracts in winter, a rigid filler snaps at the repair site and the crack opens again. Elastomeric compounds are different — they cure to a flexible film that moves with the wall instead of working against it. That flexibility is why professional painters use elastomeric products on any crack that’s failed a standard repair before.
We compared the three most widely used elastomeric paint and repair options for interior cracked walls — testing flexibility, adhesion, texture match, and how cleanly they take a topcoat. Here’s how each one performed.
Quick Picks
| Product | Best For | Flexibility | Check Price |
|---|---|---|---|
| Goodbye Cracks FG695 | Hairline & spider cracks — no knife needed | High (liquid film) | Amazon → |
| Red Devil Patch & Prime | All-in-one: patch, prime, and paint in one step | Medium | Amazon → |
| Red Devil OneTime Spackling Kit | Spot repairs — complete patch kit in one box | Medium-high | Amazon → |
🔬 Why Elastomeric Compounds Outlast Standard Spackle
Standard spackling paste contains calcium carbonate and vinyl-acrylic binder — a combination that dries hard and rigid. Rigid fillers work fine in stable conditions. But interior walls move. Temperature changes cause drywall to expand and contract by as much as 1/16 inch per 8-foot section over a year. A rigid filler can’t accommodate this movement. It fractures at the repair site — often within the first winter-to-summer cycle.
Elastomeric compounds use a higher-elongation polymer binder that allows the cured film to stretch without breaking. Some elastomeric formulas elongate 200–300% before fracturing. The wall moves; the repair moves with it. That’s the mechanical reason elastomeric products produce longer-lasting repairs on walls with any seasonal movement.
Full Product Reviews
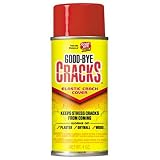
Goodbye Cracks is the only elastomeric treatment designed specifically for cracks too thin to accept a putty knife. Its low-viscosity liquid flows into hairline fractures by capillary action — you brush or roll it over the crack surface and it self-levels into the gap. After it dries, the flexible polymer film seals the crack completely and accepts any latex topcoat without additional priming on already-painted walls.
It shines on plaster walls with crazing — the web of fine hairline cracks that form on old plaster as it dries out over decades. Running a putty knife over crazing doesn’t work because the gaps are too shallow. Goodbye Cracks covers the whole network of hairlines in one pass. Paint over it in an hour. The treatment is invisible under flat paint and holds through multiple seasonal cycles without re-cracking.
Key fact: Unlike spackling, Goodbye Cracks works on cracks thinner than 1/16 inch — the width where knife-applied fillers can’t make contact and paint alone shows the crack.
✅ Pros
- Fills hairlines without a knife
- No sanding required
- Flexible film — doesn’t re-crack
- Paintable in 1 hour
❌ Cons
- Small 4 oz — limited area
- Not for cracks wider than 1/16 inch
- Needs clean, dust-free surface
Best for: Old plaster with crazing, hairline stress cracks near door frames, and any fracture too thin for knife-applied spackling.
Check Price on AmazonVia Amazon.com
🔗 Related ThePaintly Guides
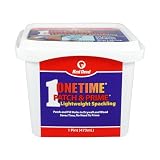
Red Devil’s OneTime Patch & Prime combines spackling and primer into a single pint — patching the crack and sealing the substrate in one step. The formula includes a primer component that prevents paint from absorbing differently over the patch than the surrounding wall. That eliminates the most common DIY mistake: applying flat paint over unprimed spackling and getting a dull, flashing spot that’s more visible than the original crack.
The lightweight formula sands smoothly without dragging or pulling. It’s not the most flexible compound in the category, but the primer integration makes it the most convenient option for anyone repairing a painted wall and painting over it the same day. The 1-pint size is well-matched to standard room repairs without excessive leftover product.
Key fact: Primer is built into the formula — eliminates the “flashing” effect where paint absorbs differently over an unprimed patch and creates a dull spot under the topcoat.
✅ Pros
- Primer built in — no extra step
- Sands without dragging
- Lightweight, easy application
- Good coverage from 1 pint
❌ Cons
- Less flexible than liquid elastomeric
- Not for deep or wide cracks
- Needs topcoat to match wall color
Best for: Smooth drywall walls, painted surfaces that need same-day repair and repainting, and anyone wanting to skip the separate priming step.
Check Price on AmazonVia Amazon.com
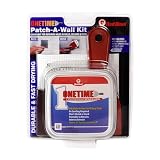
The Patch-A-Wall Kit includes spackling paste, a flexible spreader tool, and a sanding sponge — everything you need to take a crack from raw to paint-ready without rummaging through toolboxes. This is the correct choice for a first-time repair or a rental property where you don’t want to leave behind a half-used tub of compound. The lightweight acrylic spackling in the kit has better adhesion to existing paint than calcium carbonate-based fillers.
The kit size is calibrated for 3–6 medium repairs — enough for the typical inspection or move-out touch-up job. Red Devil’s formula doesn’t shrink after drying, which is the most common complaint against low-cost spackling: it appears filled while wet, then reveals a divot after drying. This formulation holds its volume.
Key fact: A complete kit with spreader and sanding sponge — no separate tool purchases needed. The no-shrink formula holds its volume after drying.
✅ Pros
- Complete kit — tools included
- No shrinkage after drying
- Good for drywall and plaster
- Easy cleanup with water
❌ Cons
- Small volume — not for large jobs
- Requires separate priming before topcoat
- Not suitable for cracks over 1/4 inch
Best for: First-time repairs, rental touch-ups, small-volume crack jobs where a complete ready-to-use kit saves time and tool cost.
Check Price on AmazonVia Amazon.com
Head-to-Head Comparison
| Feature | Goodbye Cracks | Red Devil Patch & Prime | Red Devil Kit |
|---|---|---|---|
| Crack width range | Hairline to 1/16″ | Up to 1/8″ | Up to 1/4″ |
| Flexibility | High (liquid polymer film) | Medium | Medium |
| Primer required? | No (on painted surfaces) | No (built-in primer) | Yes |
| Sanding required? | No | Yes (light) | Yes |
| Paintable in | 1 hour | 2 hours | 2–3 hours |
| Application method | Brush or roller | Putty knife | Included spreader |
Renovation Stage: REPAIR
Elastomeric repair comes before priming and painting. Complete crack treatment fully before applying any topcoat — partial sealing allows moisture to enter behind the paint film.
Crack Width Estimator — Which Product Do You Need?
🔍 Find Your Elastomeric Product Match
Answer three questions about your crack to get a product recommendation.

How to Choose the Right Elastomeric Product
Crack Width Is the Starting Point
Match the product to the crack’s physical dimensions before anything else. Liquid elastomeric sealers like Goodbye Cracks are designed for fractures too narrow to accept a knife. Knife-grade elastomeric compounds work on everything from 1/16 inch up to 1/4 inch. Beyond 1/4 inch, you need structural patching compound rather than a surface elastomeric treatment.
A practical test: run a fingernail along the crack. If the nail slips into the gap, a knife-grade compound will work. If the nail slides across the surface without catching, use a liquid sealer.
Second Repairs Need Higher Flexibility
A crack that’s opened after a previous repair tells you the wall is moving. Standard rigid spackle already failed once. The correct choice for a repeat repair is the most flexible compound available — Goodbye Cracks for hairline re-cracks, or a premium acrylic formula for wider recurring cracks. The extra flexibility is the one property that changes the outcome on a wall with active seasonal movement.
Plaster Walls Require Extra Attention
Old plaster behaves differently from drywall. It’s denser, more brittle, and often has a thin finish coat over a coarser base coat. When filling plaster cracks, dampen the crack edges lightly before applying compound — dry plaster pulls water out of the filler too fast, preventing proper curing. According to Family Handyman’s crack repair guide, wetting the crack edges before filling is one of the most commonly skipped steps in plaster repair. Additionally, the EPA’s indoor air quality guidelines note that unfilled cracks in older homes can allow moisture infiltration — a concern that makes complete sealing especially important.
Surface Texture Changes the Formula Choice
Smooth-wall compounds look wrong on textured surfaces and vice versa. If your wall has any texture beyond completely flat, the smooth elastomeric compounds in this article will create a flat spot at the repair site that catches raking light. For heavily textured walls, the correct product is DAP ElastoPatch Textured — which is covered in our full crack-covering product guide.
✅ Application Tips for Elastomeric Repairs
- Clean before applying. Elastomeric compounds need a clean, dry, dust-free surface. Vacuum the crack and wipe with a damp cloth. Let dry completely before applying any product.
- Don’t rush the cure. Elastomeric compounds need the full stated cure time to develop flexibility. Painting over an undercured elastomeric film — especially Goodbye Cracks — causes the topcoat to wrinkle at the repair site.
- Apply in overlapping passes. For liquid elastomerics, apply two coats at 90 degrees to each other. The cross-hatch pattern ensures complete coverage across the full width of any hairline network.
- Prime before topcoat on unprimed substrates. On bare drywall or fresh plaster, add a spot-prime step even after elastomeric repair. The primer seals the porous substrate and prevents uneven sheen under the topcoat.
🔗 More From ThePaintly
Our Verdict
For hairline and spider cracks — especially on old plaster — Goodbye Cracks is the only product that actually reaches into the fracture. Nothing else in the category works at that scale without a knife. For standard cracks on smooth drywall where you want to repaint the same day, Red Devil Patch & Prime eliminates the primer step and gets you to topcoat fastest. And if you want a complete kit with everything included for a clean spot repair, the Red Devil Patch-A-Wall Kit is the most organized, beginner-friendly option of the three.
Frequently Asked Questions
What is elastomeric paint and how does it differ from regular paint?
Elastomeric paint and compounds use a high-elongation polymer binder that allows the cured film to flex without cracking. Regular paint and spackling paste use rigid binders that dry hard. When a wall moves seasonally, rigid fillers crack at the repair site. Elastomeric compounds move with the wall, preventing re-cracking. Most elastomeric products designed for interior wall crack repair are technically patching compounds rather than paints — they’re applied to the crack before painting, not as a finish coat.
Can elastomeric paint bridge cracks in interior walls?
Yes — elastomeric liquid treatments like Goodbye Cracks specifically bridge hairline cracks on interior walls without any filling compound. For wider cracks, elastomeric patching compounds fill the gap and cure to a flexible film. True elastomeric wall paint (a thick coating applied like regular paint) is primarily an exterior product — interior versions focus on elastomeric patch compounds rather than full-wall coatings.
How long does elastomeric crack repair last?
A properly applied elastomeric repair on a stable wall typically lasts 5–10 years before showing any signs of re-cracking. The main factors that shorten lifespan are: ongoing structural movement (the wall is still settling), moisture infiltration behind the repair, or insufficient surface preparation before application. On stable walls with clean, dust-free surfaces, elastomeric repairs consistently outlast rigid filler repairs by 3–5x.
Is elastomeric spackling the same as regular spackling?
No. Regular spackling uses vinyl-acrylic or calcium carbonate binder that cures rigid. Elastomeric spackling uses a higher-elongation acrylic or rubber-modified polymer that retains flexibility after curing. You can’t tell by looking at them on the shelf — the distinction is in the cured performance. Read the product label for terms like “flexible,” “elastomeric,” or “permanent flexibility” to identify true elastomeric formulas.
Should I prime over elastomeric crack compound before painting?
It depends on the product. Goodbye Cracks on an already-painted wall doesn’t require a separate primer — the liquid sealer bonds to existing paint and accepts topcoat directly. Red Devil Patch & Prime includes primer in the formula. The Red Devil Patch-A-Wall Kit spackling does require spot-priming before topcoat. When in doubt, a quick coat of PVA primer over the patch prevents flashing and costs less than 5 minutes of work.