Best Paint Sprayer for Furniture: What Gets a Smooth Finish
Updated: October 2026 · By Sophie Ulman · 8 min read
Best Paint Sprayer for Furniture: What Gets a Smooth Finish
The best paint sprayer for furniture is a gravity-feed HVLP model, not an airless unit. Airless sprayers are built to move gallons across a wall fast. That extra pressure turns a drawer front or a chair rail into an orange-peel mess before you’ve backed off the trigger.
I learned how much air control matters while building my first spray booth in the garage. I’d framed it out of 1-inch PVC. The moment I switched the fan on, negative pressure folded the whole thing inward like a paper bag. I rebuilt it with 1.5-inch pipe for about $14 more, and that booth has held through every furniture project since. The sprayer matters, but so does the air moving around it.
I tested four HVLP sprayers against the kind of pieces that actually show up in a weekend refinishing project — a six-drawer dresser, a set of dining chairs, a picture frame. I picked the ones that laid down a smooth coat without clogging on chalk paint or lacquer. Below: the two decisions to make before you buy, four tested picks, and the technique that keeps furniture free of drips.
The Two Decisions Before You Buy a Paint Sprayer for Furniture
Get these two right and almost any sprayer on this list will work. Get them wrong and the best sprayer in the world won’t save the finish.
🎯 HVLP
- Fine atomization, light overspray
- Built for small, detailed surfaces
- Thinner coats — plan on 2–3 passes
- Some paints need 10–15% thinning
💨 Airless
- Sprays unthinned paint fast
- Built for walls, fences, siding
- Too much volume for small parts
- Overspray is hard to contain indoors
🪑 Already Painted or Varnished
- Scuff-sand with 220 grit first for adhesion
- A glossy top coat may need a bonding primer
- A 2.0mm tip handles thicker chalk paint
Quick Picks: Best Paint Sprayer for Furniture
| Category | Product | Best For |
|---|---|---|
| 🏆 Best Overall | HomeRight Super Finish Max HVLP | Dressers, cabinet doors, most furniture projects |
| 💲 Best Budget | HomeRight Quick Finish HVLP | First-time refinishers, small pieces |
| 🪑 Best for Batches | Wagner FLEXiO 3000 HVLP | Matching sets — dresser, nightstands, headboard |
| 🔧 Best Handheld | Wagner FLEXiO 590 Handheld HVLP | Chairs, spindles, picture frames, touch-ups |
Best Paint Sprayers for Furniture, Reviewed
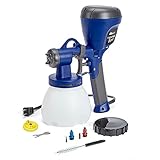
This is the sprayer I reach for first on almost any furniture job. The 450-watt motor comes with three brass tips — 4.0mm, 2.0mm, and 1.5mm. That means I’m not stuck buying a second gun when I switch from thinned chalk paint to a thicker primer. On a six-drawer dresser, the 1.5mm tip laid down a coat thin enough that I never saw a lap mark, even under raking light from a window.
Brass tips matter more than it sounds. My first cheap sprayer had a plastic tip that swelled slightly with lacquer thinner and started spitting after four uses. This one is three seasons in and still sprays the way it did out of the box. It’s heavier than the handheld units here. But for anything bigger than a single chair, that weight buys you a steadier spray pattern.
- Three brass tips cover most furniture paints
- 450W motor handles thicker chalk paint
- Consistent spray pattern after repeated use
- Quick-release cup for fast color changes
- Heavier than the handheld options here
- Needs a compressor-style hum tolerance indoors
- Overkill for a single small frame
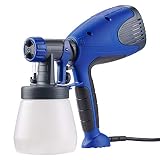
If this is your first furniture project, start here. The 500-watt motor is plenty for thinned latex or chalk paint. The whole unit is also light enough to hold overhead without your wrist giving out. I used it on the underside of a china cabinet shelf for twenty minutes straight with no fatigue — something the heavier Super Finish Max would have made miserable.
It won’t handle unthinned paint as gracefully as the pricier models. I did have to strain my paint through a mesh cone to stop the nozzle from spitting on one batch of older stock. Once I thinned that can by about 10%, it ran clean through the rest of the project.
- Lightweight for overhead and detail work
- Budget-friendly for a first sprayer
- Easy to clean between colors
- Spits on unthinned or older paint
- Smaller cup means more refills
- Single spray pattern, less adjustable
- Prepping instead of spraying? See best furniture paint for the brush-and-roller options.
- Painting built-ins instead of loose pieces? See best paint sprayer for kitchen cabinets.
- Need the full spray booth build? See how to make a DIY spray paint booth.

The 1.5-quart cup is the reason this one earns its spot. Wagner rates it to cover roughly a 10×12-foot wall per fill. On furniture, that translated into spraying a whole dresser, two matching nightstands, and a headboard before I had to stop and refill. If you’re doing a bedroom set instead of one chair, that’s the difference between an afternoon and a full weekend of start-stop refills.
The turbine is louder than the HomeRight units, loud enough that I wear ear protection in the garage. The extra cup weight also shows up as fatigue after about 45 minutes of overhead spraying. For flat work on a dresser top or drawer fronts laid out on a bench, neither issue matters much.
- Large cup means fewer refills on sets
- Handles both thin stains and latex paint
- Adjustable spray pattern for flat and detail work
- Loud turbine — ear protection recommended
- Heavier cup tires the arm overhead
- More parts to disassemble for cleaning
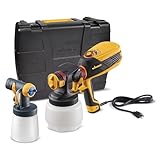
The Detail Finish nozzle is what sold me on this one. Chair spindles and picture frame moldings are exactly the shapes that make a wide-pattern sprayer frustrating. You either overspray the background or make six passes to cover one baluster. The narrower detail pattern here got into the gaps on a set of dining chair spindles in about half the time my wider gun would have taken.
Wagner rates the included iSpray nozzle at covering an 8×10-foot surface in about five minutes with latex. That’s fast for small-piece work, but it also tells you this isn’t built for a whole dresser carcass. I keep it as the second sprayer in the shop, specifically for trim-level detail that a bigger gun handles clumsily.
- Detail nozzle excels on spindles and trim
- Compact and easy to hold one-handed
- Fast cleanup between small jobs
- Too slow for a full dresser or table top
- Smaller cup needs frequent refills on bigger work
- Less control over thick, unthinned paint

Photo by Martin Baron on Unsplash
What to Look for in a Paint Sprayer for Furniture
Tip Size and Material
Furniture work lives in the 1.0–2.0mm tip range. A 1.0–1.5mm tip is right for thinned stains and lacquers; step up to 2.0mm for chalk paint or primer with more body. Brass tips hold their shape through repeated cleanings with lacquer thinner; plastic tips can swell and start spitting after a season of use.
Motor Power
Look for 450–600 watts for furniture-grade work. Anything less struggles with chalk paint without heavy thinning; anything more is airless-adjacent and starts to lose the fine atomization that makes HVLP worth choosing in the first place.
Cup Size and Weight
A smaller cup (around 1 quart) keeps the gun light for overhead and detail work, but means more refills on a big piece. A 1.5-quart cup cuts refills roughly in half on a dresser-sized project at the cost of extra wrist fatigue after 30–40 minutes.
Cleaning System
A sprayer that doesn’t clean out fully between colors is the single biggest source of clogs on the next job. Look for a cup and tip assembly that comes apart in three pieces or fewer. If cleaning takes longer than ten minutes, you’ll start skipping steps — and that’s when paint dries in the nozzle.
🧮 Paint Thinning Calculator for HVLP Sprayers
Most HVLP sprayers need thinned paint to run clean through a small tip. Enter how much paint you’re using to see how much thinner or water to add.
How to Spray Furniture in 6 Steps
1. Clean and Degrease
Wipe the whole piece with a degreaser or diluted dish soap. Furniture collects hand oils and furniture polish, and both will show up as fisheyes in a sprayed finish even over a fresh coat of primer.
2. Sand and Fill
Scuff bare wood with 220-grit; scuff an existing finish the same way to give the new coat something to grip. Fill any gouges and let the filler cure fully before sanding it flush.
3. Mask and Set Up Airflow
Mask hardware and any part you’re not painting. Then set up in a space with real airflow — a cracked garage door plus a box fan pulling air out, not just in. This is where my collapsed PVC spray booth taught me a lesson: moving air matters as much as the sprayer.
4. Thin and Test Spray
Thin according to the paint label — usually 10–15% for chalk paint, less for pre-thinned lacquer. Test on a scrap board first. You’re looking for a fan pattern with no tails or heavy spots at the edges.
5. Apply 2–3 Light Coats
Hold the gun 8–10 inches from the surface and keep it moving in overlapping passes. Two or three light coats build a smoother finish than one heavy coat. A heavy single pass is the most common cause of runs on a vertical drawer front.
6. Let It Cure Before Handling
Most furniture paint is touch-dry in 30–60 minutes and safe to stack lightly after 24 hours. Full cure — the point where it resists scuffs and stacking weight — takes 2–3 weeks. I’ve printed a book cover into a dry shelf by loading it on day three. Furniture deserves the same patience.
🔧 Field Notes From My Shop
- Strain every can, even new ones. A few flecks of dried skin from the rim are enough to clog a 1.5mm tip mid-pass.
- Spray hardware separately. Painting hinges and pulls on the piece almost always means masking tape residue in the finish later.
- Keep a spare tip on hand. A clogged tip mid-project usually isn’t worth fighting — swap it and keep moving.
- Test the color on the actual piece. Chalk paint sprays lighter than it brushes; a swatch on cardboard won’t match the real surface.
⚠️ Ventilation Isn’t Optional
HVLP sprayers put a fine mist of paint and solvent into the air of whatever room you’re working in. Garage doors cracked open plus a box fan exhausting outward is the bare minimum. For regular furniture work, a proper exhaust setup pays for itself — see how to make a DIY spray paint booth for the build that’s held up in my own garage for three years.
Renovation Stage: PAINT
Spraying is the PAINT stage — it comes after cleaning, sanding, and any repairs are done and fully cured. If you’re still deciding on a finish rather than how to apply it, start with best furniture paint first.
A Note on Airless and Brand-Specific Options
If you already own an airless unit from painting a room, the honest answer is that it rarely doubles well for furniture — see best airless paint sprayer for where airless actually wins. Shoppers comparing specific brands often land on Wagner’s airless lineup or the Graco airless paint sprayer guide. Both are the right read if you’re painting more wall than furniture. For the smallest jobs — a single lamp base or a picture frame — it’s also worth comparing against the compact models in our best small paint sprayer roundup.
Verdict: The Best Paint Sprayer for Furniture by Project
Verdict
For most furniture projects: The HomeRight Super Finish Max is the one to buy — three brass tips mean it handles everything from thinned lacquer to chalk paint without switching guns.
For a first project or a tight budget: The HomeRight Quick Finish gets you a usable finish without the investment, as long as you’re willing to strain and thin your paint.
For sets, batches, or detail trim: The Wagner FLEXiO 3000 cuts refills on multi-piece jobs, and the FLEXiO 590’s Detail Finish nozzle is worth owning alongside it for spindles and frames.
Frequently Asked Questions
What type of paint sprayer is best for furniture?
An HVLP (high volume, low pressure) sprayer is best for furniture. It atomizes paint finely and sprays at lower pressure than an airless unit, which means less overspray and a smoother coat on small surfaces like drawer fronts, chair rails, and cabinet doors. Airless sprayers are built for walls and apply far more paint per pass than furniture needs.
Should I use HVLP or airless for furniture?
Use HVLP. Airless sprayers move unthinned paint quickly across large, flat surfaces like walls and siding, which is too much volume for a furniture piece — you’ll fight orange peel and heavy overspray. HVLP’s lower pressure gives you the control to lay down thin, even coats on detailed shapes.
What paint sprayer do professionals use for furniture refinishing?
Most professional furniture refinishers use HVLP turbine or compressor-fed systems with interchangeable brass tips, typically in the 1.0–2.0mm range, so they can switch between thinned lacquer and thicker chalk paint without buying a second gun. Brass tips are preferred over plastic because they hold their shape through repeated cleaning with solvents.
How do I prepare furniture before spraying?
Clean the piece with a degreaser to remove hand oils and polish, sand bare wood or scuff an existing finish with 220-grit for adhesion, and fill any gouges before they’re sanded flush. Mask hardware and anything you’re not painting, and set up in a space with real airflow before you start spraying.
What distance should I hold the spray gun from furniture?
Hold the gun 8–10 inches from the surface and keep it moving in steady, overlapping passes. Holding it too close causes runs and heavy buildup; holding it too far causes a dry, gritty texture because the paint partially dries before it lands.
How many coats of paint does furniture need?
Plan on 2–3 light coats rather than one heavy coat. Light coats build an even, smooth finish and dry more predictably; a single heavy coat is the most common cause of runs on vertical surfaces like drawer fronts and chair legs.
Can I spray paint over stained or varnished furniture?
Yes, as long as you scuff-sand the existing finish with 220-grit first to give the new coat something to grip. A glossy varnish may also need a bonding primer — check that the primer label specifically says it adheres to existing finishes, not just “most surfaces.”
How do I avoid runs, drips, and orange peel on furniture?
Keep the gun 8–10 inches away, move it at a steady pace, and apply 2–3 light coats instead of one heavy one. Orange peel usually means the paint needs more thinning or the gun is held too close; runs usually mean too much paint went down in one pass.