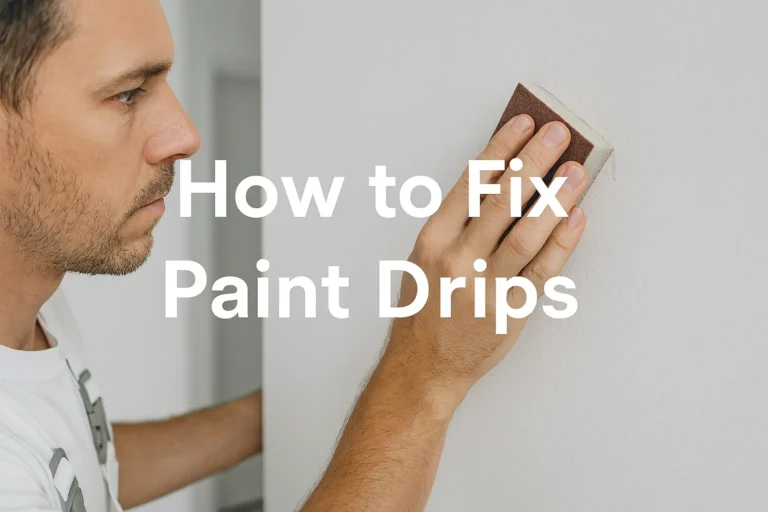
How to Paint Wood Paneling: Complete 2026 Guide
Painting wood paneling is one of the fastest, most affordable ways to modernize a room. Old wood paneling can make a home feel dark, heavy, and decades out of date — but the right coat of paint changes everything. Whether you’re updating a basement, living room, or bedroom, this complete 2026 guide covers every step: prep work, primer selection, groove technique, color ideas, and the exact products that deliver a smooth, lasting result.
Why Painting Wood Paneling Transforms a Room
Wood paneling reached peak popularity in the 1960s–80s, and much of it is still standing in American homes. The dark stain and vertical groove pattern absorbs light and closes a room down visually. A single properly applied coat of off-white or soft gray does the opposite — it reflects light, makes ceilings feel taller, and turns a dated room into a clean, contemporary space.
The before-and-after difference is dramatic because painting wood paneling doesn’t just change color — it changes the entire character of the room. Rooms that felt dated and cramped suddenly read as modern and open. This is particularly striking in basements, where limited natural light makes the choice of a light, reflective paint color even more impactful.
🏠 What Changes After Painting Wood Paneling
- Room brightness: Light colors reflect 80%+ more light than dark stained wood
- Perceived size: Walls visually recede, making rooms feel larger
- Resale value: Buyers respond strongly to updated paneling vs. original dark wood
- Project time: One weekend for an average room; no demolition required
- Cost: Fraction of the cost of drywall installation or paneling removal
Recommended Products for Painting Wood Paneling
These four products cover every step of the project — from stain-blocking primer through final topcoat. Each is Amazon Prime-eligible with thousands of verified reviews.
| Product | Stage | Best For | Size | Link |
|---|---|---|---|---|
| KILZ 2 All-Purpose Primer | PRIME | Best All-Surface Primer | 1 gal | View › |
| Zinsser Bulls Eye 1-2-3 Plus Spray | PRIME | Best Stain Blocker | 13 oz | View › |
| Rust-Oleum Chalked Ultra Matte Paint | PAINT | Best Paint for Paneling | 30 oz | View › |
| Rust-Oleum Painter’s Touch 2X Primer | PRIME | Best Budget Aerosol Primer | 12 oz | View › |
KILZ 2 is the industry workhorse for painting wood paneling — and for good reason. This water-based formula bonds to paneling, drywall, plaster, masonry, and brick equally well, giving it the flexibility to cover an entire room regardless of what surfaces meet each other. It blocks mild stains, seals tannins, and dries in under 30 minutes, which means you can prime an entire room before noon and topcoat the same afternoon.
Coverage is exceptional at 300–400 square feet per gallon on smooth paneling, making this one of the best value primers for larger rooms. Contractors consistently recommend KILZ 2 as the go-to first coat on wood paneling because it prevents bleed-through on lightly stained boards without the price premium of shellac-based formulas. It’s also mildew-resistant — an important quality for basement paneling where moisture is a recurring issue.
Key Fact: Covers 300–400 sq ft per gallon on smooth paneling. Dries in 30 minutes. Mildew-resistant formula for basements and humid rooms.
- Outstanding coverage — 300–400 sq ft/gallon
- Fast 30-minute dry time
- Mildew-resistant for basements
- Works on paneling, drywall, plaster & more
- Moderate stain-blocking on very dark stains — may need 2 coats
- Gallon format — aerosol needed for touch-ups
⭐ Best for: Painting full rooms of wood paneling efficiently — particularly basements, living rooms, and any room with standard stained wood paneling.
Check Price on Amazon → Via Amazon.com
Dark or heavily stained wood paneling needs a stronger stain-blocking formula than standard primer. Zinsser Bulls Eye 1-2-3 Plus is the go-to solution — it blocks tannins from cedar and redwood, prevents water stains from bleeding through, and handles smoke residue and old varnish without a second coat. The spray format makes it ideal for targeting problem areas on paneling before applying a roller-on primer to the full surface.
The 30-minute dry time is the fastest in this category. It’s particularly useful on groove lines, knots, and board edges where stain bleed is most common and a brush or roller doesn’t quite reach. Painters on professional forums describe this as the primer to reach for “when you have no idea what’s underneath the paneling” — and for old, unknown-history wood paneling, that peace of mind is valuable. It dries to a white base that accepts any latex or oil topcoat without compatibility issues.
Key Fact: Blocks tannins, water stains, and bleed-through in one coat. Spray format targets grooves, knots, and problem areas precisely.
- Best-in-class stain and tannin blocking
- 30-minute dry time — fastest available
- Spray format targets grooves precisely
- Accepts latex and oil topcoats
- 13-oz aerosol — use for problem spots, not full wall coverage
- Higher cost per ounce than gallon primers
⭐ Best for: Dark wood, cedar or redwood paneling, water-damaged boards, and any surface where standard primer has failed to block stain bleed-through.
Check Price on Amazon → Via Amazon.com
For painting wood paneling, ultra-matte finishes are almost always the right choice — and Rust-Oleum’s Chalked formula delivers a luxurious flat finish that looks intentional and modern rather than painted-over. The Linen White tone is warm rather than stark white, which means it reads as soft and inviting rather than clinical on large wall surfaces. The all-in-one formula requires no separate primer on previously painted surfaces in good condition.
The chalked formula bonds well to previously finished wood without heavy sanding, making it excellent for update projects where the paneling is in decent shape but the color is outdated. One 30-oz container covers approximately 150 square feet — plan on 2–3 units for an average-sized room. Buyers on Amazon frequently comment on how the matte finish hides imperfections in older paneling, and the color is consistently described as “the exact shade of warm white I was looking for.” The washable surface also holds up in high-traffic rooms, which some ultra-flat paints don’t.
Key Fact: Ultra-matte finish hides paneling imperfections better than satin or eggshell. Warm Linen White avoids the stark, cold look of pure white on large wall surfaces.
- Ultra-matte finish hides surface flaws
- Warm white tone — sophisticated, not clinical
- No primer needed over previously painted surfaces
- Washable — holds up in living areas
- 30-oz container — multiple units needed for full rooms
- Primer still required on bare or raw wood paneling
⭐ Best for: Living rooms, bedrooms, and basements where you want a warm, modern matte finish that elevates rather than just covers the paneling.
Check Price on Amazon → Via Amazon.com
When you need spot primer for knots, patched areas, or hard-to-reach groove lines on wood paneling, this aerosol primer from Rust-Oleum is the most cost-effective option available. It dries in 20 minutes, bonds to both wood and previously painted surfaces, and lays down a white base that any topcoat accepts cleanly. The wide fan pattern covers flat panel surfaces quickly, while the can’s tip allows precision on tighter spots.
It isn’t a heavy-duty stain blocker like the Zinsser above — but for standard wood paneling that doesn’t have extreme bleed-through issues, Painter’s Touch 2X provides reliable adhesion at the lowest cost per can. Many DIYers use one Painter’s Touch 2X can to prime groove lines and edges before rolling the flat panel surface with KILZ 2, giving them the best of both formats without overspending on either. Dry time is 20 minutes to touch and 1 hour to topcoat.
Key Fact: 20-minute dry time and lowest cost per can — ideal for spot-priming grooves, patches, and edges before rolling the main surface.
- Fastest dry time in this roundup (20 min)
- Lowest cost per can
- Ideal aerosol format for groove lines & edges
- Multi-surface adhesion
- Limited stain-blocking on heavily stained wood
- Small 12-oz can — multiple cans needed for full rooms
⭐ Best for: Spot priming groove lines, patches, and edges — used in combination with a gallon primer rolled on the main flat surface area.
Check Price on Amazon → Via Amazon.comWhere This Project Sits in the Renovation Protocol
Painting wood paneling spans two stages: PRIME → PAINT. Before you open any primer, complete the full PREP stage: clean all surfaces, fill any damaged areas with wood filler, and nail down any loose boards. Skipping PREP means primer bonds to grease, dust, and loose material — not to the actual paneling. For panels with old varnish or peeling finish that needs stripping, see our guide to the best paint removers for wood before priming.
Paint Coverage Calculator for Wood Paneling
Use this calculator to estimate how much primer and paint you need before heading to Amazon. Wood paneling uses more paint than drywall due to texture and grooves.
🧮 Room Paint Coverage Calculator
Step-by-Step: How to Paint Wood Paneling
This is the best way to paint over old wood paneling — followed exactly, it produces results that look professionally done. According to Family Handyman, the primer stage is what separates a paint job that lasts a decade from one that looks dingy within a year.
- Clean the entire surface. Use a mild degreaser or TSP (trisodium phosphate) substitute mixed with warm water. Remove all grease, cooking residue, and dust. Allow the wood to dry completely — minimum 24 hours. Dirty paneling is the number-one cause of primer adhesion failure.
- Fill grooves (optional) and repair damage. If you want a flat, smooth wall, use a lightweight spackling compound or flexible wood filler in the grooves and any holes. Sand flush once dry. If you prefer to keep the groove texture, skip this step.
- Apply stain-blocking primer first. Roll or brush KILZ 2 onto the full surface. For dark staining, knots, or bleed-prone areas, spray Zinsser Bulls Eye over problem spots first, let it dry, then roll the main coat. Don’t skip this step — even on light-colored paneling.
- Sand lightly between primer and paint. Once primer is fully dry, knock down any raised grain with 220-grit sandpaper. This step takes 15 minutes and transforms the final finish. Wipe clean with a tack cloth before topcoating.
- Apply your first coat of paint. Roll large flat sections first, then brush grooves and edges. Work in sections, keeping a wet edge to avoid lap marks. Two coats is standard — thin and even beats thick and heavy every time.
- Apply second coat after full dry time. Wait the full recommended dry time between coats — not just until touch-dry. Second coat reactivates the first if applied too soon, causing texture issues. Typically 2–4 hours for latex interior paint.
- Remove tape and clean up immediately. Pull painter’s tape at a 45° angle while the paint is still slightly flexible — not fully hard — for the cleanest edge. Hard paint pulls and tears.
Painting Wood Paneling with Grooves
The grooves in V-groove or beadboard paneling require a different approach than flat surfaces. Rolling over grooves without a brush pass first leaves paint bridges across the channel — thin spots that crack, bubble, and eventually peel.
The correct technique is: brush first, roll second. Load a 2-inch angled sash brush and work down the groove channels, ensuring full paint contact in the recessed area. Immediately follow with a roller on the flat panel faces. The roller picks up any excess from the brush pass and evens the surface. This takes more time than rolling alone, but produces a consistent, professional result. For long paneling walls, a paint sprayer eliminates this two-step process — see our beginner’s guide to spray guns for setup guidance.
Painting Wood Paneling Without Sanding
You can paint wood paneling without sanding if you prepare the surface correctly and choose the right primer. Sanding is necessary when the surface has a glossy finish that prevents primer adhesion — but most wood paneling is matte-stained rather than high-gloss, and a quality bonding primer handles adhesion without mechanical abrasion.
The critical steps for painting without sanding are: thorough cleaning (no exceptions), a quality bonding primer like KILZ 2 or Zinsser Bulls Eye, and allowing each coat to fully cure before the next. Skipping the clean step is what causes failure in no-sand projects — grease and silicone residue prevent even the best bonding primer from adhering. If your paneling has a factory lacquer or polyurethane coating, light sanding with 120-grit is still recommended because most primers won’t bond reliably to a slick film-formed finish without mechanical tooth.
Painting Wood Paneling Ideas: Color and Finish
Light Colors for Brightness
Off-white, pale gray, and soft beige are the most popular choices for painting wood paneling — and for good reason. Light tones reflect maximum light, making rooms feel larger and airier. For basement paneling where natural light is limited, these shades make the biggest visual difference. Warm whites like Linen White (Rust-Oleum’s Chalked formula) read as sophisticated rather than stark, avoiding the “hospital wall” effect of pure white on large surfaces.
Bold Colors for Drama
Deep navy, forest green, charcoal, and terracotta are having a moment in interior design — and wood paneling is an excellent canvas for these shades. A full wall of deep green paneling with white trim creates a rich, layered look that reads as intentionally designed rather than budget renovation. For bold colors, gray primer reduces the number of topcoat layers needed to achieve full coverage. Need help matching a bold color to existing elements in the room? Our guide on how to match paint already on a wall can help.
Two-Tone and Accent Approaches
Two-tone paneling — a lighter color on the upper half and a deeper tone below the chair rail — adds architectural interest without a full renovation. An accent wall painted in a contrasting color while the remaining walls stay neutral is another high-impact approach. Whitewash techniques, where diluted white paint is applied over existing stained wood, preserve wood texture while dramatically lightening the tone for a farmhouse or coastal aesthetic.
Finish: Always Matte or Eggshell for Paneling
Matte and eggshell finishes are the right choice for wood paneling on walls. Satin and semi-gloss highlight every surface imperfection — groove shadows, board joints, and texture variation become visible under raking light. Flat finishes absorb light and minimize these features, making the wall read as a smooth, unified surface. According to This Old House, eggshell is the most practical choice for living areas — it’s slightly more washable than flat while remaining low-sheen enough to avoid the glare problems of higher-sheen finishes.
🎨 Pro Tips: Painting Wood Paneling Like a Professional
- Prime the groove lines twice. Grooves are the thinnest spots and where bleed-through is most common. Give them a second pass of stain-blocking primer while the first coat is still wet — it costs three minutes and prevents problems later.
- Use a thick-nap roller (¾ inch) on paneling. The extra nap thickness pushes paint into the subtle texture of wood paneling more effectively than a thin foam roller, producing better coverage per coat.
- Work top-to-bottom, right-to-left (or reverse for lefties). Starting at the top and working down means drips fall onto unpainted areas you’ll cover shortly — not onto freshly painted sections you’d have to touch up.
- Don’t paint a cold room. Wood paneling in a basement can hold moisture that prevents primer adhesion if the room is below 50°F. Run a dehumidifier and space heater for 24 hours before priming.
Our Verdict
Painting wood paneling is one of the highest-impact, lowest-cost home renovation projects available to a homeowner. A single weekend, the right primer, and two coats of a quality paint turn a dated, dark room into a bright, modern space — without demolition, drywall, or professional labor costs.
The most important decision you’ll make is primer selection. Use KILZ 2 as your primary gallon primer for standard paneling, and keep Zinsser Bulls Eye 1-2-3 spray on hand for groove lines, knots, and any area that risks stain bleed. For the topcoat, Rust-Oleum Chalked Ultra Matte in Linen White is hard to beat — the warm tone and ultra-flat finish make painted paneling look intentionally designed, not covered up.
Prepare properly, prime thoroughly, and apply two thin coats. That’s the complete formula for a result that holds for years rather than months.
Frequently Asked Questions
Can you paint wood paneling without sanding?
Yes — you can paint wood paneling without sanding if you clean the surface thoroughly and apply a quality bonding primer like KILZ 2 or Zinsser Bulls Eye. Sanding becomes necessary only when the paneling has a high-gloss lacquer or polyurethane finish that resists primer adhesion. For standard matte-stained paneling, a good primer and thorough cleaning are sufficient to achieve lasting adhesion without mechanical surface preparation.
What kind of primer do I need for wood paneling?
For most wood paneling, a water-based stain-blocking primer like KILZ 2 All-Purpose is the right choice. It seals the wood, prevents tannin bleed-through, and provides excellent topcoat adhesion. For dark, cedar, or redwood paneling with strong tannins, upgrade to Zinsser Bulls Eye 1-2-3 Plus — it blocks stains that standard primer cannot. Skip primer entirely and the tannins will bleed through your topcoat within weeks.
How many coats of paint does wood paneling need?
Wood paneling typically needs one coat of primer and two coats of paint for full coverage and lasting durability. In practice: 1 primer coat, let dry completely, light 220-grit sand, then 2 topcoat layers with full dry time between each. Dark paneling going light-colored (dark brown to white, for example) may need a third topcoat coat. Two thin coats always outperform one thick coat — they dry more evenly and adhere better.
What’s the best paint finish for wood paneling?
Matte (flat) or eggshell finishes are best for painting wood paneling on walls. These low-sheen finishes minimize the visibility of groove shadows, board joints, and surface imperfections. Satin and semi-gloss are too reflective for paneling — under raking light they emphasize every variation in the surface. Eggshell is slightly more washable than flat and is the practical choice for living rooms and high-traffic areas.
How do I paint wood paneling with grooves?
The correct technique for painting wood paneling with grooves is brush-first, roll-second. Use a 2-inch angled sash brush to fully coat the groove channels first, then immediately follow with a roller on the flat panel faces. This sequence ensures full coverage in the recessed areas while the roller evens the surface and removes excess paint. Never roll over unseated grooves — paint bridges across the gap and eventually cracks and peels.
Does painted wood paneling last?
Yes — painted wood paneling with proper preparation and a quality primer lasts 7–10 years before needing a refresh coat. The primary factors are surface preparation (clean, dry, primed) and paint quality. Painted paneling in basements may need attention sooner if moisture levels aren’t controlled. Touch-up painting on high-contact areas (around switches, corners) every 2–3 years extends the overall lifespan of the paint job significantly.
What colors work best on wood paneling?
For brightness and a modern look, off-whites and warm whites (like Linen White or Alabaster) are the most popular choices and produce the most dramatic before-and-after results. For a sophisticated, intentional look, deep blues, charcoals, and forest greens are current favorites in interior design. Avoid pure white on large paneling surfaces — it reads as cold and stark rather than clean. Warm neutrals and deep saturated tones both work beautifully on wood paneling’s texture.
Should I fill the grooves in wood paneling before painting?
Filling the grooves is optional and depends on your aesthetic goal. Leaving grooves visible creates a subtle texture that reads as intentionally rustic or architectural. Filling them with lightweight spackling compound and sanding flush produces a seamless wall that looks more like smooth drywall. Filling grooves adds 2–4 hours of work for an average room but dramatically changes the finished appearance. Neither approach is wrong — it’s a design preference.