How to Paint Kitchen Cabinets: The Complete Step-by-Step Guide
Updated: April 2026 | By ThePaintly Editorial Team
Learning how to paint kitchen cabinets correctly can save you $5,000–$15,000 over replacing them entirely. The result looks professional and lasts a decade when done right. The problem is that most DIY guides skip the steps that actually matter — proper prep, the right primer, and correct application technique. This guide covers everything, in the right order.
We’ll walk through every stage from pulling the doors to the final topcoat, recommend the exact tools and products that work, and give you the real time estimates so you can plan your project without surprises.
Tools & Supplies You Need
Before you start, assemble everything. Running to the hardware store mid-project is the fastest way to ruin a wet edge. Here’s the complete list:
- 🧴 Degreaser / deglosser
- 🖌️ 2–2.5″ angled sash brush
- 🪣 Shellac-based primer
- 🎨 Cabinet-grade paint (semi-gloss)
- 📦 Foam rollers (4″ mini)
- 🔩 Screwdriver + labels (painter’s tape)
- 🪚 220-grit sandpaper
- 🧹 Tack cloth
Product Picks for Each Stage
These are the four products we recommend across the full project — all validated and available on Amazon with our affiliate tag.
| Stage | Product | Purpose | Link |
|---|---|---|---|
| 🟠 PREP | Krud Kutter Gloss-Off 32oz | Degrease & degloss in one step | View on Amazon |
| 🔵 PRIME | Zinsser BIN Shellac Primer | Stain-blocking adhesion primer | View on Amazon |
| 🟢 PAINT | Rust-Oleum Transformations Basics Pure White | Durable semi-gloss cabinet finish | View on Amazon |
| 🖌️ APPLY | Purdy XL Glide 2″ Angle Sash Brush | Smooth, no-brush-mark application | View on Amazon |
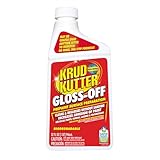
Krud Kutter Gloss-Off Prepaint Deglosser — 32 oz
If there’s one product that saves the most people from a failed cabinet paint job, it’s a quality deglosser. Krud Kutter Gloss-Off cleans, degreases, and etches the surface in one application — you wipe it on, let it sit for 10 minutes, and the old glossy finish is ready to accept new primer. No sanding required. No rinsing required. This 32 oz bottle covers a typical kitchen’s worth of cabinet surfaces easily.
The formula dissolves grease, cooking oil, and waxy buildup that accumulates on kitchen cabinets over years. These are exactly the contaminants that cause paint to peel even when everything else is done correctly. Krud Kutter solves that at the prep stage, before primer goes on. Users on multiple home improvement forums consistently name it the non-negotiable first step for any cabinet repaint.
✅ Pros
- Eliminates sanding on smooth surfaces
- Removes grease that primer won’t stick to
- Fast — dry in under 20 minutes
❌ Cons
- Strong smell — ventilate well
- Not a substitute for sanding rough or damaged surfaces
Best for: Previously painted or varnished cabinets in good condition.
Check Price on Amazon →Via Amazon.com
🔗 Related Reads on ThePaintly
- Best Paint Remover for Wood & Metal — for cabinets that need full stripping, not just deglossing
- How to Remove Paint with Steam — steam as an alternative prep method
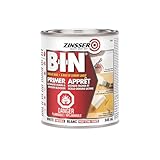
Zinsser BIN Shellac-Based Primer-Sealer — 1 Quart
Zinsser BIN is the primer contractors keep in their van for a reason. It’s shellac-based, which means it bonds to virtually any surface — bare wood, previously painted surfaces, glossy varnish, and even slick MDF — without needing sanding. More importantly, it seals tannins and stains so completely that dark wood knots and water stains simply disappear under it. Water-based primers can’t make that claim reliably.
For kitchen cabinets, shellac primer serves another critical function: it seals cooking grease into the surface rather than letting it bleed through your topcoat. If you’ve ever painted cabinets and seen yellow or brown bleed-through appear weeks later, water-based primer was the culprit. BIN stops that. It dries in 45 minutes and can be recoated in under an hour — so it doesn’t slow down your workflow significantly.
✅ Pros
- Bulletproof adhesion — even over glossy varnish
- Stops bleed-through that water-based primers miss
- Fast dry time
❌ Cons
- Strong alcohol smell — needs ventilation
- Cleanup requires denatured alcohol
Best for: Oak, pine, or any wood cabinet with tannins or previous staining.
Check Price on Amazon →Via Amazon.com

Purdy XL Glide Angular Sash Paint Brush — 2 inch
The brush is responsible for whether your cabinets look painted or sprayed. A cheap brush deposits bristle marks that become permanent once the paint cures. The Purdy XL Glide is a professional-grade tool with a proprietary Clearcut filament blend — synthetic bristles engineered to hold more paint and release it smoothly, without the chatter marks you get from stiff or low-quality bristles.
The 2-inch angle sash width is the ideal size for cabinet faces and door panels. It’s narrow enough to cut in cleanly on edges and inside corners, but wide enough to move efficiently across flat faces. Pair it with a 4-inch mini foam roller for the flat sections — brush for edges and detail, roll for flat faces — and your finish will rival spray work. Purdy brushes are handcrafted in the USA and, with proper cleaning, last through multiple projects.
✅ Pros
- No bristle marks in cured finish
- Holds paint well — fewer dips needed
- Durable — lasts multiple projects
❌ Cons
- Higher price than discount brushes
- Requires proper cleaning to maintain
Best for: Anyone who wants a brush finish that looks as smooth as spray.
Check Price on Amazon →Via Amazon.com
🔗 Want to Spray Instead of Brush?
- Best Airless Paint Sprayer for Furniture — lay doors flat and spray for a factory finish
- Beginner’s Guide to Paint Spray Guns — learn spray technique before you buy
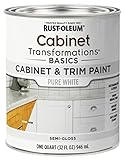
Rust-Oleum Transformations Basics — Pure White Cabinet Paint
Once the surface is deglossed, primed, and dry, this is the topcoat we reach for on white or light kitchen cabinet projects. The Transformations Basics formula is engineered for exactly this use case — it dries hard enough to resist scratches and chips within a week, accepts cleaning without dulling, and applies beautifully with either a foam roller or the Purdy brush above. The semi-gloss finish sits at exactly the right sheen level for kitchens: reflective enough to wipe clean, subdued enough not to highlight surface imperfections.
One quart covers up to 50 sq ft. A standard kitchen with 12 standard-sized cabinet faces requires roughly 3 quarts for two coats. Order one extra — you’ll want it for touch-ups in year two. The 30-minute dry time keeps your project moving without marathon wait gaps between coats.
✅ Pros
- Fast recoat time keeps project on schedule
- Excellent leveling — minimal brush marks
- Washable finish for busy kitchens
❌ Cons
- Quart-only sizes mean more bottles for large kitchens
- Reaches full hardness after 7 days
Best for: The topcoat on light or white kitchen cabinet projects.
Check Price on Amazon →Via Amazon.com
💡 The 3 Mistakes That Ruin Cabinet Paint Jobs
1. Skipping degreasing. Cooking oil residue is invisible but completely blocks paint adhesion. Always degrease, even on cabinets that look clean.
2. Using wall primer. Standard drywall primer has poor adhesion on wood and no stain-blocking. Use a dedicated cabinet primer — shellac if in doubt.
3. Rushing the recoat. Applying a second coat before the first is fully dry causes crinkling, lifting, and bubbles that require sanding back and starting over.
Project Time & Cost Estimator
Estimate your total project time and material cost before you start.

Step-by-Step: How to Paint Kitchen Cabinets
Follow these 7 steps in order. Each one is load-bearing — skip a step and the one after it is compromised.
Step 1 — Remove Doors, Drawers, and Hardware
Take every door off its hinges. Label each door with painter’s tape and a number corresponding to its cabinet opening — reinstalling unlabeled doors takes four times as long. Remove drawer fronts, pull out all hinges and handles, and set hardware in a labeled zip-lock bag. Working on doors flat (laid across sawhorses or a work table) eliminates drips entirely and gives you access to the full edge.
Step 2 — Clean and Degrease
Wipe every surface with Krud Kutter Gloss-Off or a TSP substitute. Apply with a clean cloth, work in sections, and allow 10 minutes of dwell time. Grease and cooking oil that accumulate over years are invisible but completely prevent paint adhesion. This step is the single biggest predictor of how long your cabinet paint job will last.
Renovation Stage: PREP → PRIME → PAINT
This project spans three renovation stages. Most cabinet paint failures happen at the PREP stage — not the paint stage. Invest your time here first. See our guide to painting wood surfaces for more surface prep techniques.
Step 3 — Lightly Sand or Degloss
If your cabinets have a shiny varnish or lacquer finish, the deglosser alone may not be enough. A light scuff with 220-grit sandpaper across all surfaces provides mechanical adhesion that deglosser alone can’t guarantee. You’re not sanding to bare wood — just dulling the sheen. Wipe off all dust with a tack cloth before continuing.
Step 4 — Apply Shellac Primer
Apply one coat of Zinsser BIN using a separate cheap brush or foam roller — save your Purdy for the topcoat. Work quickly because shellac dries fast. You don’t need thick coverage; a thin, even coat is all that’s needed. Allow 45 minutes to dry, then lightly sand with 220-grit to smooth any raised grain. Wipe with a tack cloth. According to the EPA, proper ventilation during primer application is essential — open windows and run a fan.
Step 5 — Apply First Coat of Cabinet Paint
Load the Purdy brush and cut in all edges, inside corners, and raised panel details first. Then roll the flat faces with a 4-inch mini foam roller. Work in the direction of the wood grain. Apply thin coats — it’s far better to add a third coat than to flood the surface trying to cover in two. Allow 2 full hours before the second coat, even if the paint feels dry to touch sooner.
Step 6 — Apply Second Coat and Inspect
Repeat Step 5. After the second coat dries, hold a work light at a raking angle to the surface. This reveals any brush marks, drips, or missed spots while the paint is still young enough to sand back lightly if needed. Sand with 320-grit if required, wipe clean, and apply a third coat only where necessary.
Step 7 — Reinstall After Full Cure
Most cabinet paints reach functional hardness in 24 hours but achieve full cure in 7 days. Reinstall doors and hardware after 24 hours, but avoid hard impacts or heavy scrubbing for a full week. The paint continues hardening during this period — treat it gently and it will reward you with a finish that lasts.
Pro Summary
Painting kitchen cabinets is a 2–3 day project that returns enormous value per dollar spent. The process is straightforward when done in the right order: degrease → degloss → prime → sand → paint (×2) → cure.
The products that make the biggest difference are the deglosser (most skipped) and the primer (most downgraded to cheap latex). Krud Kutter and Zinsser BIN solve both. The Purdy brush solves the brush-mark problem. The rest is patience and thin coats.
Frequently Asked Questions
How long does it take to paint kitchen cabinets?
A standard kitchen with 12 cabinet doors takes 2–3 days of active work: roughly half a day for prep and priming, a day for two coats of paint (including dry time between coats), and a day of cure time before reinstalling hardware. The full cure takes 7 days.
Can I paint kitchen cabinets without removing them?
You can paint cabinet face frames in place. However, cabinet doors should always be removed and painted flat — it eliminates drips, gives you access to all edges, and produces a significantly better finish. Painting doors while hung is a shortcut that almost always shows.
What is the best way to avoid brush marks when painting cabinets?
Use a high-quality synthetic brush (like the Purdy XL Glide) for edges and a foam roller for flat faces. Apply thin coats and don’t over-work the paint — once applied, leave it alone. Thin coats self-level as they dry; thick, overworked coats show every stroke.
Do I need to sand kitchen cabinets before painting?
A light sand with 220-grit is recommended after deglossing and after priming — not to remove material, but to smooth raised grain and improve adhesion. You can use a liquid deglosser instead of the initial sand, but the post-prime sand is worth doing on any project where you want a professional result.
How do I prevent cabinet doors from sticking after painting?
Use a paint with good block resistance (like KILZ Tribute), allow full cure time before rehinging, and leave doors slightly ajar for the first week. Block resistance is a formulated property of cabinet-specific paints that prevents the painted door from fusing to the painted frame under pressure.
Is it worth painting kitchen cabinets instead of replacing them?
Yes — in almost every case. New kitchen cabinets cost $5,000–$25,000 installed. Painting existing cabinets costs $150–$600 in materials and produces a transformation that is visually comparable. The only scenario where replacement wins is when the cabinet boxes themselves are structurally compromised.