How to Limewash a Brick Fireplace: Complete DIY Guide
Updated April 2026 • By The Paintly Editorial Team
A dated brick fireplace can drag down an entire living room. The good news: learning how to limewash a brick fireplace is one of the fastest, most affordable ways to transform it — no demolition, no tile work, no contractor required. The technique takes a single afternoon and a can of limewash, and the result looks like something from an Italian farmhouse rather than a 1985 suburban build.
This guide covers everything you need: the right products, the exact steps, how to control the final opacity, and the most common mistakes that ruin an otherwise good fireplace makeover. Whether you’re going for a subtle chalky wash or full white coverage, the process is the same — and we’ll show you every variable so you can dial in exactly the look you want.
Quick Picks: Best Limewash Products for Fireplaces
| Pick | Product | Best For | Size | Link |
|---|---|---|---|---|
| Best Kit | Romabio Fireplace Kit 1L | Standard fireplace surrounds | 1L + brush + tools | See Price |
| Large Kit | Romabio Fireplace Kit 2.5L | Floor-to-ceiling brick surrounds | 2.5L + brush + tools | See Price |
| Best Brush | Romabio Large Masonry Brush | Wide walls & oversized fireplaces | Large | See Price |
Product Reviews

Romabio Fireplace Kit — Classico Limewash 1L with Masonry Brush
Romabio designed this kit specifically for fireplace surrounds, and it shows. The 1L of Classico Limewash covers a typical brick fireplace surround (roughly 25–40 sq ft at a 1:1 dilution with two light coats), and the bundled small masonry brush has stiff synthetic bristles engineered to work the product deep into mortar lines — something a standard paint brush simply can’t do. The kit also includes a stir stick and bucket opener, so you’re not hunting for tools mid-project. For most homeowners with a standard-sized fireplace, this is the one kit that genuinely has everything.
The Classico formula is authentic slaked lime — it penetrates brick, carbonates as it cures, and delivers that signature matte, variegated finish. Because it bonds at a mineral level, the color won’t peel or flake the way regular paint does near heat. Limewash is non-combustible once cured, which makes it uniquely suited to fireplace brick that regular paint manufacturers actively caution against. The main limitation: 1L is sized for average fireplaces, not full-wall surrounds. If your brick extends floor to ceiling, move to the 2.5L version below.
✅ Key fact: Limewash is non-combustible — unlike latex paint, it is safe to use directly on fireplace brick.
- Complete kit — nothing extra to buy
- Masonry brush sized for fireplaces
- Heat-safe, non-combustible formula
- Authentic mineral lime finish
- 1L may fall short on large surrounds
- Whites/off-whites only
- Requires dilution and mixing
Best for: Average-sized fireplace surrounds, first-time limewashers, complete kits

Romabio Fireplace Kit — Classico Limewash 2.5L with Masonry Brush
The 2.5L version of the Romabio Fireplace Kit is the right choice when your fireplace brick extends well beyond the standard box surround — think floor-to-ceiling statement fireplaces, double-sided fireplace walls, or oversized chimney breast applications common in older homes. At a 1:1 dilution, 2.5L covers 190–270 sq ft in two coats, giving you comfortable headroom for large areas without running out mid-application. Running out of limewash mid-project is a real problem, because dye-lot matching isn’t a concern with a mineral product, but working over partially dried edges creates lap marks that are difficult to correct.
Everything in the kit is identical to the 1L version — same masonry brush, stir stick, and instructional sheet — with the obvious advantage of significantly more product. The per-liter cost is also more economical at the larger size. If you’re uncertain whether you need 1L or 2.5L, measure your brick surface area first. Our calculator below will give you a precise estimate before you order.
✅ Key fact: More economical per liter — the right call if your fireplace brick exceeds 30 sq ft.
- Ample coverage for large surrounds
- Better value per liter
- Same complete kit contents
- Eliminates mid-project shortfall risk
- Overkill for small standard fireplaces
- Leftover product has ~12-month shelf life
Best for: Floor-to-ceiling brick surrounds, chimney breasts, double-sided fireplaces
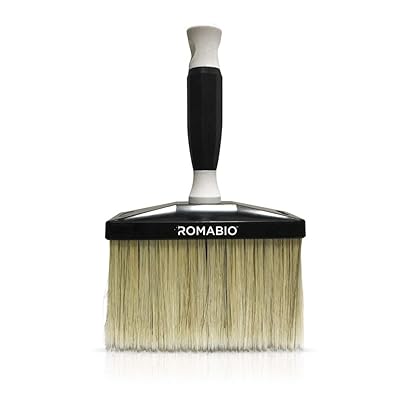
Romabio Large Masonry Brush
If you already own Romabio Classico Limewash (the standard 2.5L can, not the kit) and need the proper brush separately, the Romabio Large Masonry Brush is the professional-grade tool. The synthetic bristles are specifically formulated to handle high-pH lime paints without degrading — a critical spec that standard paint brushes fail on. The large format carries significantly more product per load, reducing the number of dips and keeping your working wet edge alive longer. For a fireplace with a broad, flat brick face, this brush cuts application time roughly in half compared to the smaller kit brush.
It’s also the right tool if you’re tackling any project beyond the fireplace — an interior feature wall, an entryway, or an exterior facade. One brush handles all of it. The synthetic bristles clean up easily with water, and with proper care the brush will last through dozens of projects. If you’re purchasing the Romabio Fireplace Kit, the small brush is already included — buy this large version only if you’re working with a standard 2.5L can or handling a particularly wide surface.
✅ Key fact: Synthetic bristles rated for high-pH lime paint — standard brushes degrade within one use.
- Professional-grade bristles for lime paint
- Larger format — faster coverage
- Reusable with proper cleaning
- Works for any masonry surface
- Not needed if buying the kit (brush included)
- Too wide for tight mortar-line detail work
Best for: Wide brick faces, existing Romabio Classico users, large fireplace or wall projects
⚡ Fireplace-Specific Pro Tips
- Clean the soot first — thoroughly. Even trace amounts of soot in the brick pores will cause adhesion failure. Use TSP substitute and a stiff nylon brush, then rinse and wait 48 hours to dry.
- Work section by section from top to bottom. Gravity drips are invisible if you work top-down but very noticeable if you work bottom-up and drip onto already-dried sections.
- Use a damp cloth, not a wet brush, for distressing. On fireplace brick, a cloth gives you finer control and prevents over-removal of the limewash from mortar lines.
- Mist lightly — don’t soak. Fireplace brick is often drier and more porous than exterior brick. A very light mist (not a full rinse) is enough to slow absorption without creating unpredictable puddles.
- One thin coat first, then evaluate. The first coat always looks uneven. Resist the urge to go heavy — thin, layered coats give you full control over the final opacity.
🧱 Stage: PREP — Surface Condition Is Everything
Limewashing a fireplace is a PREP-stage project. The brick must be free of soot, previous sealers, and any film-forming coatings before limewash will bond correctly. Fireplace brick that has been painted (even once) will not accept mineral limewash without stripping first. If your brick has any sheen or previous coating, check our guide on removing paint with steam before you begin — getting this step right is the difference between a finish that lasts and one that peels within a year.
🧮 Fireplace Coverage Calculator
Estimate how much limewash your fireplace requires before ordering.

Step-by-Step: How to Limewash a Brick Fireplace
Mix TSP substitute in warm water and scrub the entire brick surface with a stiff nylon brush. Focus on mortar lines where soot accumulates. Rinse thoroughly and allow 24–48 hours to dry completely. This is non-negotiable — any soot residue will prevent adhesion.
Tape off the mantel, firebox opening, hearth, and adjacent walls with painter’s tape. Lay drop cloths on the hearth and floor. Limewash drips and splashes more than paint, and cleaning it off stone or wood later is difficult once it begins to cure.
Add clean water to the limewash at a 1:1 ratio (equal parts product and water) for medium opacity. Mix with a drill stirrer or by hand for 60 seconds until smooth and uniform. For a lighter, more translucent finish, go 1:1.5. Never go below 1:3 — too much water kills adhesion.
Spray the brick surface with a light mist of clean water. The brick should appear damp but not wet. This slows the absorption rate and gives you 3–4 extra minutes to blend before the limewash sets — critical in the smaller working area of a fireplace.
Starting at the top and working down, apply limewash with the masonry brush in cross-hatching strokes. Work in sections of 4–6 bricks at a time. Drive the brush firmly into mortar lines. The first coat will look patchy — this is normal and expected.
While each section is still soft (within 15–30 minutes), use a damp cloth or stiff nylon brush to scrub back sections you want more brick visible through. Work lightly — you can always add more coverage with a second coat, but pulling too much off is harder to fix.
Allow the first coat to dry 2–4 hours. Limewash dries significantly lighter than it applies wet — don’t panic at the initial color. Once dry, evaluate opacity. If you want more coverage, repeat steps 4–6 with a slightly thicker mix (less water).
Allow full cure for 7 days before using the fireplace. Limewash does not require a sealer on interior surfaces, but a breathable mineral shield can be applied if you want extra protection against soot staining near the firebox opening.
⭐ Our Verdict
For most homeowners, the Romabio Fireplace Kit (1L) is the perfect starting point — it’s the only product on this list engineered specifically for fireplace use, includes every tool you need, and delivers an authentic mineral finish that no DIY whitewash mix can replicate. If your fireplace brick runs floor to ceiling, move straight to the 2.5L kit. The Romabio Large Masonry Brush is the tool to buy if you already own the standard Classico can and need a proper brush — standard paint brushes will let you down within the first coat.
Frequently Asked Questions
Yes — mineral limewash is one of the safest finishes available for fireplace brick. It contains no solvents or VOCs, and once cured becomes a stable, non-combustible mineral carbonate. It won’t off-gas when the fireplace is lit, unlike latex or oil-based paints. This makes limewash the correct choice for fireplace brick where most other decorative paints are explicitly not recommended.
Most fireplaces need two coats for balanced, even coverage. The first coat is absorbed unevenly by porous brick, leaving a mottled look — this is normal. The second coat smooths out the tone while preserving the organic texture. If you want a very light, translucent wash, one diluted coat may be enough. If you prefer near-white full coverage, apply a slightly thicker second coat and allow it to dry without distressing.
Use a TSP substitute (trisodium phosphate alternative) dissolved in warm water and scrub firmly with a stiff nylon brush. For heavy soot buildup, apply the solution and let it sit 10 minutes before scrubbing. Rinse thoroughly with clean water and allow 24–48 hours to fully dry before applying limewash. Never use bleach-based cleaners on brick — bleach can react with the alkaline lime and affect curing.
Not directly. Mineral limewash requires a porous, raw masonry surface to bond. If the brick has been painted, sealed, or whitewashed with a film-forming product, the limewash will sit on top of the old coating rather than penetrating the brick, and it will peel within weeks. You’ll need to strip the existing paint first. Test by dripping water on the surface — if it absorbs within 30 seconds, limewash will likely bond; if it beads, stripping is required.
A well-applied mineral limewash on interior fireplace brick typically lasts 10–20 years without needing attention. It won’t peel or flake — instead, it weathers gradually and can actually develop a more attractive aged appearance over time. The area immediately around the firebox opening may accumulate soot staining more quickly, but this can be cleaned with a diluted acid solution or gently scrubbed back without affecting the overall finish.
Start with a 1:1 ratio (one part limewash to one part water) for your first coat. Fireplace brick is often very dry and porous, which means it absorbs product quickly. The 1:1 ratio gives you a manageable working time and medium opacity. For a lighter wash, increase water to 1:1.5. For denser coverage on a second coat, use the product at 1:0.75. Always test on a single brick and let it dry before committing to the whole surface.
A thick-nap roller (1¼” pile) can work on large, flat brick faces, but it will bridge over mortar lines rather than working into them — leaving the mortar stark white against a washed brick face. For a fireplace, where the details and texture of the mortar joints are visible up close, a masonry brush gives significantly better results. Use the roller only if your fireplace brick is unusually smooth and the mortar lines are very shallow.