
How to Fix Uneven Paint
The fastest way to fix uneven paint is to find out which of three problems you actually have first — flashing sheen, patchy hiding, or lap marks. The repair for one is close to useless on another. Sanding the wrong kind just doubles your work.
I learned that the hard way with two gallons of the same white. Both came from the same counter on the same afternoon. One rolled out in a single coat. The other stayed streaky through three coats and showed every lap mark under a lamp held at an angle. The only real difference, it turned out, was which pigment was listed first on the back label. Titanium dioxide first means real hiding power. Buried further down means you’re paying for filler. That mix-up cost me two and a half extra coats and half a day I didn’t have.
Below is the one-minute light test for diagnosing uneven paint, plus the fix for each type. I also cover five tools worth keeping on hand: a conditioner, a roller, a brush, a pole, and a sprayer.
What’s on this page
The Two Decisions That Matter Before You Touch Uneven Paint
Everything else on this page is detail. These two calls decide whether your fix holds or you’re back here after the next coat.
Decision one: which kind of uneven paint are you looking at?
Wait for dusk, or kill the overhead lights. Hold a work light low and close to the wall. Rake the beam sideways across the surface instead of pointing it straight on. Uneven paint shows up as one of three patterns under that light, and each one has a different cause.
Flashing sheen looks shiny or dull in patches of the same color. Usually it’s a touch-up or a second coat applied with a different roller, on a different day, at a different dry time. Any of those changes the gloss enough to show. Patchy hiding is the old color or bare drywall tone still ghosting through after two coats. That’s low hiding power, not low effort. Lap marks are visible overlapping bands that follow your rolling direction. They come from working too slowly, or rolling back over paint that had already started to skin.
Decision two: patch the spot or recoat the whole wall?
Flashing sheen almost never patches cleanly. Fresh paint over a repair dries at a slightly different gloss than paint that’s cured for years. That’s the same sheen-versus-color confusion I cover in how to fix paint drips. Recoat corner to corner, or the patch just becomes a second defect — a different shape than the one you started with. Patchy hiding usually needs one more full coat with a higher-hiding product. Cover the whole wall, not just the thin spot. Lap marks are the one you can sometimes fix locally. But only after you’ve corrected the technique that caused them — otherwise the next pass lays down the exact same ridge.
Quick Picks at a Glance
Five tools, one for each cause. You won’t need all five. The sprayer only makes sense when the whole wall is uneven, not one patch.
| Product | Problem It Fixes | Best For |
|---|---|---|
| Flood Floetrol Conditioner | Lap marks from fast drying | Painting solo in a warm room |
| Wooster Pro/Doo-Z Roller Cover, 3/8" | Stipple and texture unevenness | Replacing a worn or mismatched roller |
| Purdy Angular Sash Brush, 2.5" | Picture-framing at edges | Clean cut lines at ceilings and trim |
| Purdy Power Lock Extension Pole | Pressure that changes top to bottom | Rolling a full wall solo |
| HomeRight Super Finish Max | Severe patchy hiding, whole wall | Starting over with one even coat |
The Five Tools I Actually Use
Best for Eliminating Lap Marks
Flood Floetrol Latex Paint Additive & Conditioner, 32 oz
Floetrol doesn’t change the color or the coverage. It slows how fast the paint sets up on the wall. That gives you a longer window to roll back into the wet edge before it starts to skin. That window is exactly what’s missing when lap marks show up in a warm room, or under a space heater running in winter.
I mix it in at about 10% by volume, on anything I’m rolling solo in a room over 75°F. The lap marks that used to show under a side lamp stop showing at all. It thins the paint slightly, so I load the roller a little heavier to compensate.
- Cuts lap marks and brush strokes noticeably
- Extends open time without changing sheen
- Works in both latex and acrylic paint
- Thins paint slightly — don’t overdo the ratio
- Fixes application marks, not patchy hiding
Best for: anyone rolling a whole wall alone in a warm room.
Best for Even Texture
Wooster Pro/Doo-Z 9" Roller Cover, 3/8" Nap
A worn roller cover is a hidden cause of uneven paint most people never suspect. The nap flattens and sheds after a few uses. A flattened section lays down less paint than the rest of the roller. That shows up as a faint stripe once the wall dries.
I replace this cover every two to three rooms. I don’t try to stretch a fourth use out of it. The 3/8-inch nap is the one I reach for on drywall in good condition. It lays down enough paint without adding the orange-peel texture a thicker nap leaves behind.
- Lint-free, so no fibers end up in the finish
- Consistent nap means consistent film thickness
- Cheap enough to replace often
- Too short a nap for heavily textured walls
- Needs replacing sooner than a cheaper cover looks like it does
Best for: smooth to lightly textured drywall in good condition.
Best for Clean Edges
Purdy White Bristle Adjutant Angular Sash Brush, 2.5"
Picture-framing is a visible band around a wall’s edges where the color looks slightly different. It’s almost always a cutting-in problem, not a paint problem. A loaded or worn brush drags more paint right at the corner than the roller lays down two inches in. That extra film dries at a different sheen.
This is the brush I load only a third of the way up the bristles. I tip it off in one direction before I touch the actual cut line. Skipping that tip-off step on a fully loaded brush is the single most common reason I see picture-framing in someone else’s work.
- Angled tip holds a straight line without tape
- Stiff enough bristles to control the edge
- Holds up through multiple repaints
- Not built for heavy, thick coatings
- Needs cleaning immediately or the tip splays
Best for: cutting in ceiling lines and trim without picture-framing.
Best for Consistent Pressure
Purdy Power Lock Extension Pole, 4–8 Feet
Rolling a full wall by hand, your arm tires before the wall is finished. A tired arm presses harder at the start of a section than at the end. That pressure change is exactly what shows up as a faint light-to-dark gradient down a wall under raking light. It’s not a paint defect at all.
With a pole locked at the right length, I can roll from the baseboard to the ceiling without reaching. The pressure stays the same stroke after stroke, and that gradient disappears. It sounds minor. It’s the single tool that fixed the most uneven-paint complaints I’ve looked at — cheaper than any paint upgrade.
- Keeps roller pressure constant top to bottom
- Locks at any length, not fixed increments
- Light enough for a full room solo
- Takes a session to get the length dialed in
- Overkill on anything shorter than about 6 feet
Best for: solo painters doing full walls or ceilings.
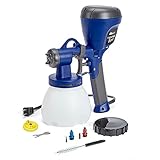
Best for Starting Over Evenly
HomeRight Super Finish Max HVLP Paint Sprayer, 3 Brass Tips
When a wall is uneven everywhere, not in one patch, a roller just adds another inconsistent coat on top of the last one. At that point I stop patching. I lay down one uniform coat with a sprayer instead, which removes the roller’s pressure and lap variables completely.
The three brass tips are what make this worth the extra setup over an aerosol can. The smaller tip handles a thinned latex wall coat. I thin it about 10%, and run it through the included viscosity cup first. Skip that step and the gun spits, which creates its own kind of unevenness.
- One uniform coat, no lap or pressure variation
- Three tips cover primer through topcoat
- Pays for itself past one full room
- Needs thinning and a viscosity test first
- Overspray means masking the room, not just the trim
Best for: a wall so uneven everywhere that patch fixes aren’t worth attempting.
Via Amazon.com
Pro Tips From the Ladder
Do the raking-light test before you buy anything. A lamp held low and sideways on a dark wall tells you more in a minute than any product description will.
Match the roller nap you used originally if you’re only patching a spot. A smooth roller over a section rolled with a thicker nap telegraphs the texture difference instantly under side light.
Stir, don’t shake, a gallon that’s been sitting. Pigment settles to the bottom. An unstirred can is the single most common hidden cause of patchy hiding in an otherwise careful repaint.
Keep a wet edge by rolling toward your last stroke, not away from it. Rolling away from a stroke that’s already started to skin is where most lap marks begin.
Let a touch-up cure a full 24 hours before judging it in daylight. Paint lightens and the sheen settles as it cures. A patch that looks wrong at hour two often disappears by the next morning.
Renovation Stage: FINISH
Uneven paint is a finish-stage problem, but the cause almost always sits one step earlier, at application. Fixing the stripe or patch in front of you doesn’t fix the technique that made it. Do that, and you’re back here after the next coat.

Photo by Andrew Itaga on Unsplash
What Actually Causes Uneven Paint
You’re diagnosing on four properties, and only four. Ignore everything else on the label.
Hiding power and pigment order
Check the back label before you check the brand name. If titanium dioxide is listed first in the ingredients, the paint has real hiding power. It should cover old color or drywall tone in two coats. Buried further down the list means more filler. Filler is cheaper, not more opaque — it’s exactly the gap that turned my mismatched gallon into three streaky coats. If a patch still ghosts through after that, the surface underneath may need a tinted primer first. See how to use primer to tackle the toughest problems.
Open time and keeping a wet edge
Every paint has a window where it stays workable enough to blend a new stroke into the last one. Heat, a fan, or a thin coat all shrink that window. That’s exactly when lap marks start. If you’ve thinned the paint yourself to make it flow, check how to thin latex paint. It covers ratios that extend working time without wrecking hiding along with it.
Nap length and surface texture
A nap that’s too short for a textured wall skips across the high points and leaves the low points bare. A nap that’s too long on smooth drywall adds a stipple that wasn’t there before. Match the nap to the surface, not to whatever cover is already on the roller. Our best paint roller covers guide breaks down nap length by wall type. The best paint roller for textured ceiling covers the heavier end of that range. For a bigger wall fast, see the best large paint roller.
Sheen level and why touch-ups flash
Flat sheens hide unevenness. Anything above satin shows every roller lap and every touch-up under the wrong light. A touch-up that flashes almost never means the wrong color. It means a different tool, a different day, or a thinner coat than the surrounding wall. That’s the whole subject of how to match paint already on a wall. Clean the surface before any of this matters at all. A greasy or dusty wall keeps new paint from bonding evenly, no matter what’s in the can. That’s covered in how to clean walls before painting.
When Sanding Makes Uneven Paint Worse
Flashing sheen. Sanding a shiny patch just adds a texture difference on top of the gloss difference that’s already there. Recoat instead of sanding.
A wall that’s uneven everywhere, not in one spot. At that scale, sanding a dozen patches creates a dozen new ones. Recoat the whole surface as one job.
Anything painted before 1978. Sanding lead-based paint releases lead dust, the most dangerous way to disturb it. Test first — the EPA lead-safe guidance covers what testing and containment look like.
How to Fix Uneven Paint in 5 Steps
1. Run the one-minute light test
Hold a work light low and sideways across the wall in a dim room. Note whether the problem is shiny or dull patches, visible old color, or ridges that follow a rolling direction. That single observation decides every step after this one.
2. Match the fix to the type
Flashing sheen needs a recoat, not a patch. Patchy hiding needs one more full coat with a higher-hiding product. Lap marks need a technique fix before you touch the roller again. Mixing these up is how a ten-minute fix turns into a repainted wall.
3. Prep only what you’re actually recoating
If you’re recoating corner to corner, a quick dust and tack-off is enough. If you’re patching a lap mark locally, feel for the ridge with the back of your hand. Your eye misses it more often than your fingers do. Knock it down with 220-grit sandpaper, but only where you can actually feel it.
4. Mix in conditioner and roll with a wet edge
Add Floetrol at about 10% in a warm room. Work in sections small enough to finish before the edge starts to skin. Roll toward your last stroke, not away from it.
5. Recoat corner to corner and let it cure before judging
Go wall to wall, not patch to patch. Wait the full 24 hours before you check your work in daylight. Judging a wet or half-cured coat is how people start a second unnecessary recoat.
The Verdict
If your light test shows flashing sheen, skip the touch-up kit. Recoat the wall corner to corner with the same roller nap — that’s the only fix that actually holds.
If it’s patchy hiding, add one more full coat with a higher-hiding paint and 10% Floetrol before you blame the brand.
And if it’s lap marks from a warm room or a tired arm, the conditioner and the pole fix most of it. No product upgrade beats that combination.
Questions I Get Asked
Why does paint look uneven?
Uneven paint comes down to one of three causes. A sheen difference happens when touch-ups or second coats catch the light differently. A hiding difference means old color or drywall tone still shows through. A lap-mark difference comes from rolling technique. The fix depends entirely on which one you have. Start with the light test above, not the paint can.
How do you fix uneven paint sheen?
Sand almost never fixes sheen. It only adds a texture difference on top of the gloss difference that’s already there. Recoat the wall corner to corner with the same roller nap and the same number of coats you used originally. The sheen levels out evenly instead of in a patch.
What causes paint streaks or roller marks?
Streaks and roller marks come from working too slowly in a warm room. The edge of your last stroke starts to skin before the next stroke overlaps it. Mixing in a conditioner like Floetrol at about 10% extends that window. Roll toward your last stroke instead of away from it, and the edge stays wet long enough to blend.
How do you fix uneven paint lines around edges without repainting the whole wall?
Edge lines, often called picture-framing, usually mean the cut-in brush loaded more paint at the corner than the roller laid down nearby. Reload the brush to only a third of the bristles, and tip it off before touching the wall. Feather the new cut line a few inches past the old one instead of tracing it exactly. For a cleaner line without tape next time, see the best way to paint edges between wall and ceiling.
What causes uneven ceiling paint specifically?
Ceilings show unevenness more than walls because light travels along them instead of hitting them straight on. Every ridge or sheen difference casts a shadow there. The usual cause is a roller running dry mid-pass. Reload before it starts to skip, and finish each section with one continuous pass rather than small dabs.
Can you fix uneven paint without repainting everything?
Sometimes. Lap marks and small hiding gaps often fix with one more full coat over the problem area, feathered wide. Sheen flashing almost never patches cleanly. Recoat corner to corner. Otherwise the patch becomes its own visible defect — just a different shape than the one you started with.
How do you prevent uneven paint next time?
Stir the can fully before you start, not just a quick swirl. Settled pigment is a common hidden cause of patchy hiding. Keep a wet edge by working in sections smaller than your open time. Use the same roller nap for the whole wall, and the texture stays consistent top to bottom.
Do you need to sand before fixing uneven paint?
Only for lap marks or ridges you can feel with your hand. A light pass with 220-grit sandpaper knocks the ridge down before you recoat. Sheen flashing and patchy hiding aren’t texture problems. Sanding them does nothing but dull the surface, and waste the 20 minutes you needed for the actual fix.